InfyBooks keeps your customers, suppliers, invoices, expenses and payroll in one workspace. These guides walk you through every screen — what each field means, what happens when you press save, and how the pieces connect.
Before you send documents to customers, spend a few minutes on these settings. They control what appears on every invoice, estimate and receipt you print or email.
Go from a brand-new workspace to a sent invoice and a recorded payment. Follow the steps in order — each one takes a couple of minutes.
In the app: Settings, Customers, Invoices
1. Sign in
Open app.infybooks.online and sign in with the email and password you received when your workspace was created. If you've forgotten your password, click Forgot Password? on the login screen and follow the reset link sent to your email.
2. Add your company details
Everything you enter here prints on your documents, so do this first.
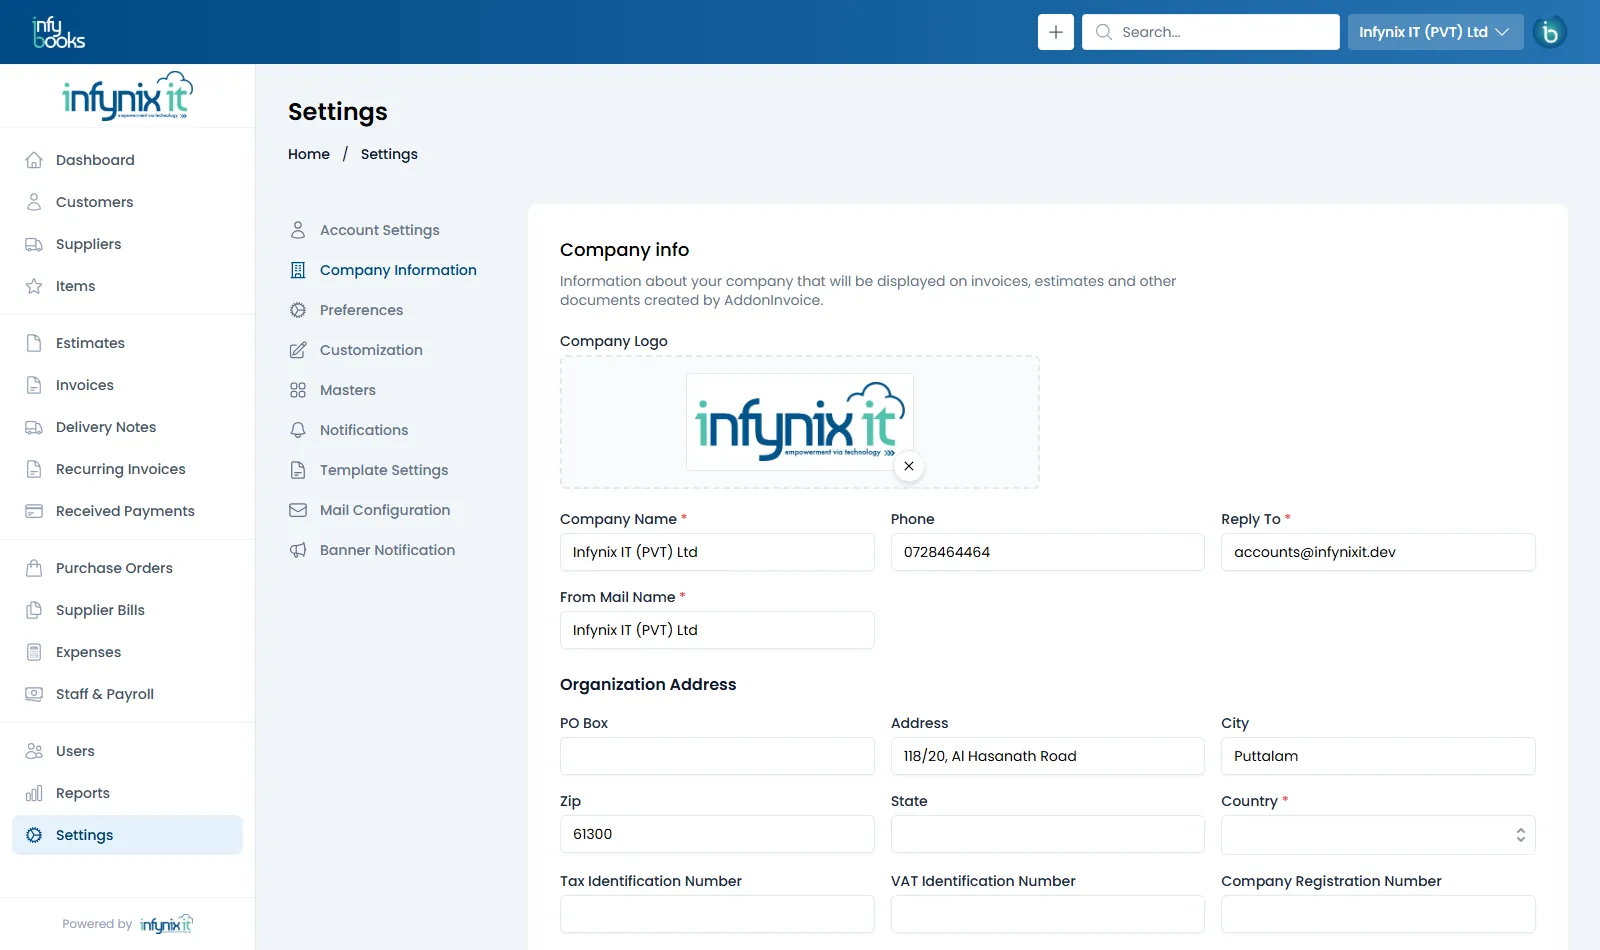
Go to Settings › Company Information.
Upload your Company Logo, and fill in Company Name, Phone and your Organization Address.
Add your Tax Identification Number, VAT Identification Number and Company Registration Number if you have them.
Click Save.
Then open Settings › Preferences and confirm your Time Zone, Date Format and Financial Year. See Company information and Preferences for every field.
3. Choose your document numbers
InfyBooks numbers every invoice, estimate, payment and bill automatically. The default works out of the box, but if you want your own style (for example ABC/IN/001), set it now in Settings › Customization — before you issue documents, so your sequence stays clean. See Document numbering.
4. Add your taxes (if you charge any)
Go to Settings › Masters › Tax Types, click Add New Tax, and enter the tax name and percentage. Once a tax exists you can apply it on any invoice with + Add Tax. See Taxes.
5. Add a customer
Open Customers and click New Customer.
Enter the Display Name and Phone. The Customer Code is filled in for you.
If the customer already owed you money before you started using InfyBooks, enter it as the Opening Balance.
Click Save Customer.
6. Add the things you sell
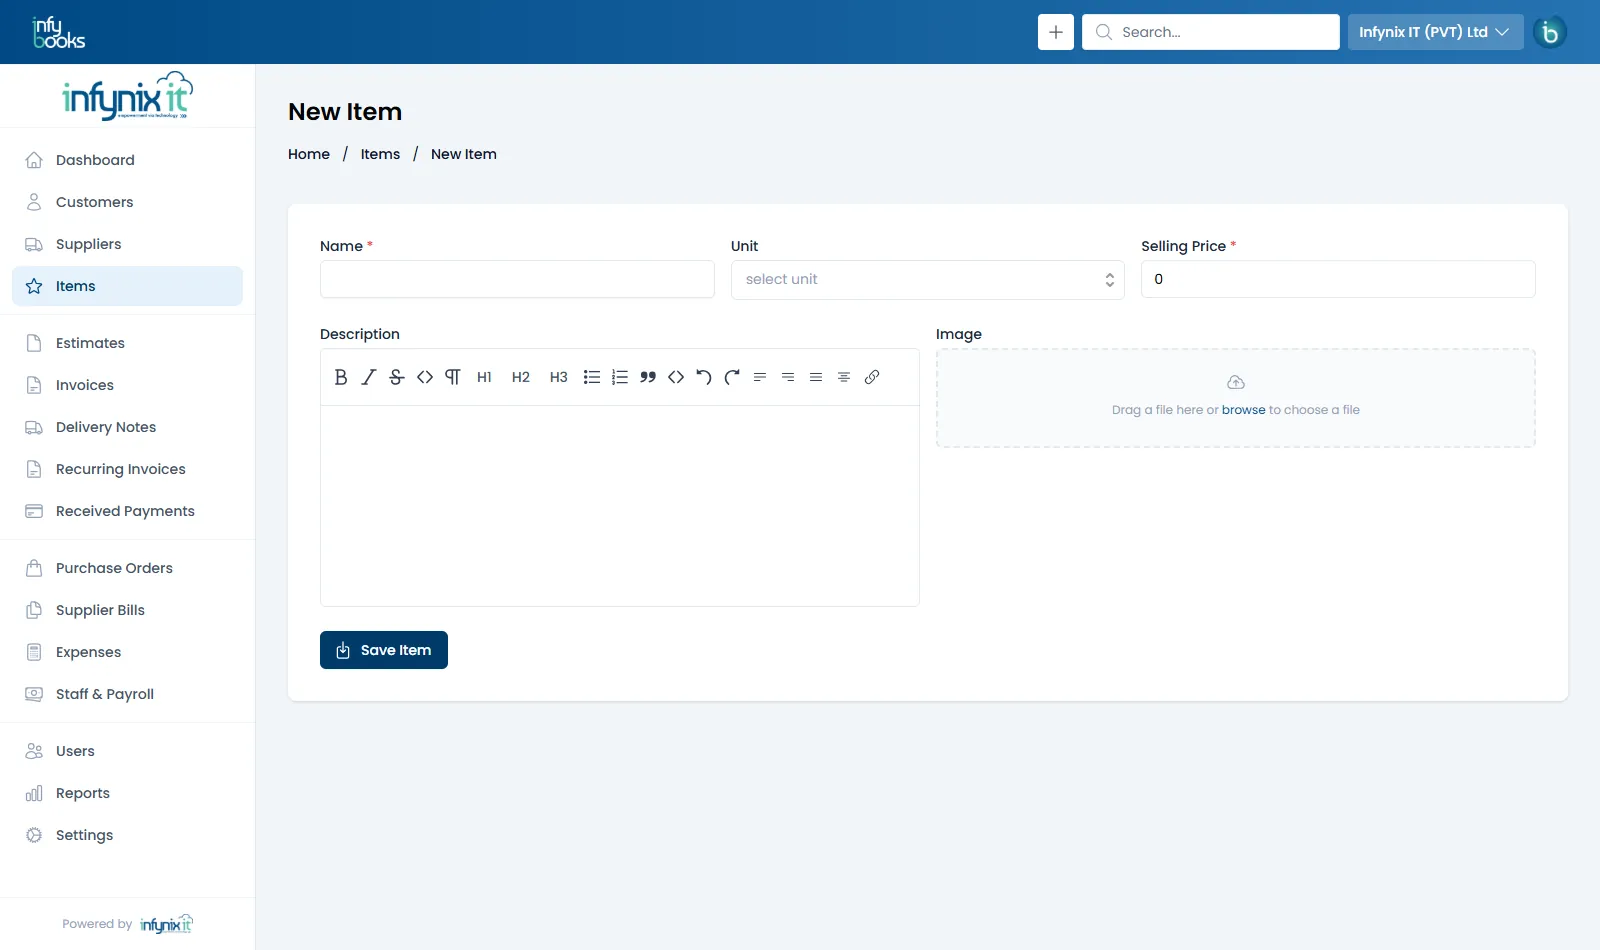
Open Items › New Item, enter a Name, Unit and Selling Price, then Save Item. Items are optional — you can always type a line directly on an invoice — but they save time and keep prices consistent.
7. Create and send your first invoice
Click the + button in the top bar and choose New Invoice.
Click New Customer in the left panel and pick the customer you created.
Choose Terms (for example Net 30) — the Due Date updates automatically.
Add your items, quantities and prices. Add a discount or tax if needed.
Click Save Invoice. You'll land on the invoice view with a live PDF preview.
Use the dropdown next to Record Payment to Send Invoice by email, or Download the PDF / Copy URL to share it yourself.
8. Record the payment
When the customer pays, click Record Payment on the invoice (or go to Received Payments › New Payment). Enter the Amount Received, Payment Mode and date, then save. The invoice status changes to Paid (or Partially Paid) and the dashboard updates instantly.
Next steps
Invite your team from Users, set up recurring invoices for regular customers, and upload your letterhead so every PDF carries your branding.
Getting Started
Finding your way around
InfyBooks uses the same layout on every screen. Once you know the sidebar, the top bar and the list/view pattern, every module works the same way.
The sidebar
The left sidebar is grouped by what you're doing:
Group
Modules
Contacts & catalogue
Dashboard, Customers, Suppliers, Items
Sell
Estimates, Invoices, Delivery Notes, Recurring Invoices, Received Payments
You'll only see the modules your role allows. If a menu item is missing, ask your administrator to check your role permissions.
The top bar
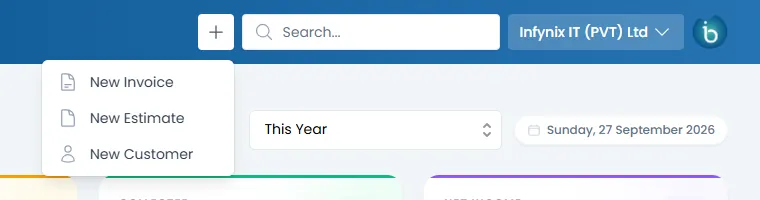
Quick create (+) — opens a menu with New Invoice, New Estimate and New Customer, available from any screen.
Search — finds customers by name as you type (owners also see matching users). Pick a result to open it.
Company switcher — if you have access to more than one company, click the company name to switch. Every list, report and number series belongs to the selected company.
Profile menu — your avatar, with links to your account settings and sign out.
The quick-create menu, search box and company switcher in the top bar.
Lists, filters and bulk actions
Every module opens on a list. On a list you can:
Switch between status tabs — for example All, Draft, Sent and Due on Invoices.
Click Filter to narrow by customer, status, date range or document number.
Tick the checkboxes on the left to select several rows and act on them together (for example, delete).
Use the ⋯ menu at the end of a row for actions on that record — edit, view, send, clone, delete.
You can choose which columns appear in each list from Settings › Customization.
Document views
Opening an invoice, estimate, payment or bill shows a split view: the list of documents on the left (with its own search, filter and sort) and the selected document on the right with a live PDF preview. The action bar above the preview gives you:
Button
What it does
Edit
Opens the document form to make changes.
Delete
Permanently removes the document (you'll be asked to confirm).
Copy URL
Copies a public link your customer can open in a browser without logging in.
View
Opens that public page in a new tab.
Download
Saves the PDF to your computer.
▾ (dropdown)
More actions: send by email, mark as sent, clone, convert and so on, depending on the document.
Invoices, estimates, recurring invoices, purchase orders and supplier bills share one form layout:
Contact panel (top left) — click New Customer / New Supplier to pick an existing contact or create one on the spot.
Header fields (top right) — number, dates, terms and an optional Reference Number (for the customer's PO number or your own internal reference).
Items table — pick a saved item or type a new one, set quantity and price. Drag the handle on the left to reorder lines. Click Add New Item for more lines.
Notes — a rich-text box for terms, bank details or thank-you messages. + Insert Note drops in a saved note; Insert Fields adds placeholders such as the customer's name.
Totals — sub total, discount (fixed amount or percentage), taxes and the grand total, calculated as you type.
Getting Started
Dashboard
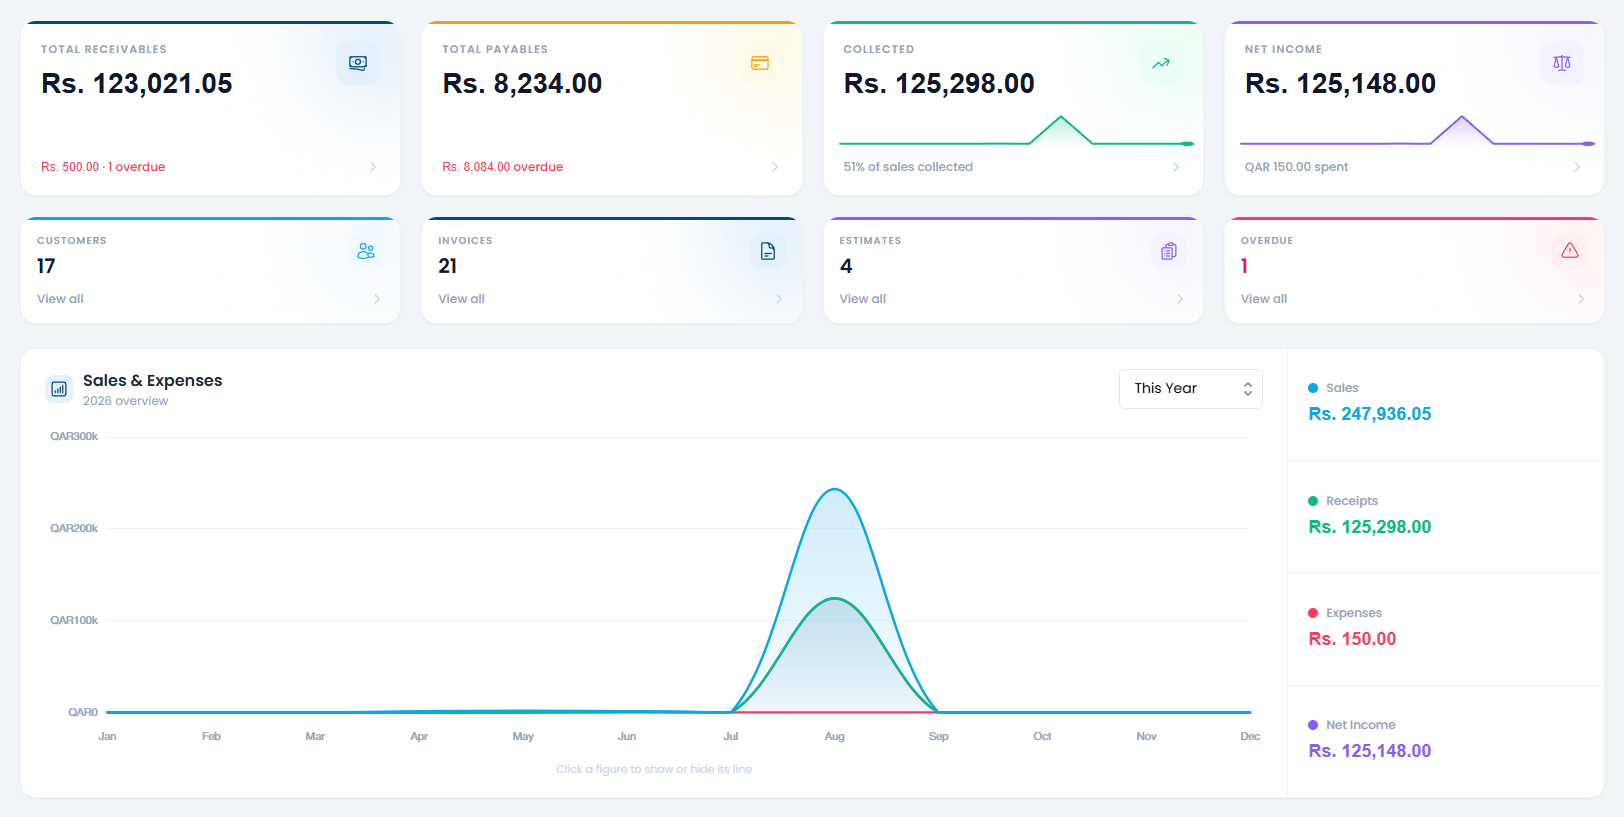
The dashboard is the first screen you see after signing in. It answers three questions at a glance: who owes you, who you owe, and whether the business made money this period.
In the app: Dashboard
The dashboard: headline cards, counters and the Sales & Expenses chart.
Choosing a period
Use the period selector in the top-right corner to switch between This Year, Previous Year and Last 12 Months. All cards and the chart recalculate for the period you pick. "This Year" follows the financial year set in Preferences.
Headline cards
Card
What it shows
Total Receivables
Everything customers still owe you across unpaid invoices. The line underneath shows how much of that is overdue and on how many invoices.
Total Payables
What you still owe suppliers on open supplier bills, with any overdue amount highlighted.
Collected
Money received from customers in the period, with a trend line and the percentage of sales collected.
Net Income
Receipts minus expenses for the period. The line underneath shows total spent.
Below them, four counters show your number of Customers, Invoices, Estimates and Overdue invoices. Click View all on any card to jump straight to that filtered list.
Sales & Expenses chart
The chart plots four lines month by month: Sales (invoiced), Receipts (collected), Expenses and Net Income. The panel on the right shows each total with a percentage change versus last month.
Click a figure in the right-hand panel to show or hide its line — handy when one large month flattens the others.
Contacts & Items
Customers
A customer profile holds everyone you bill — their contact details, addresses, opening balance and a running history of every estimate, invoice and payment.
In the app: Customers
Add a customer
Go to Customers and click New Customer (or use + › New Customer from anywhere).
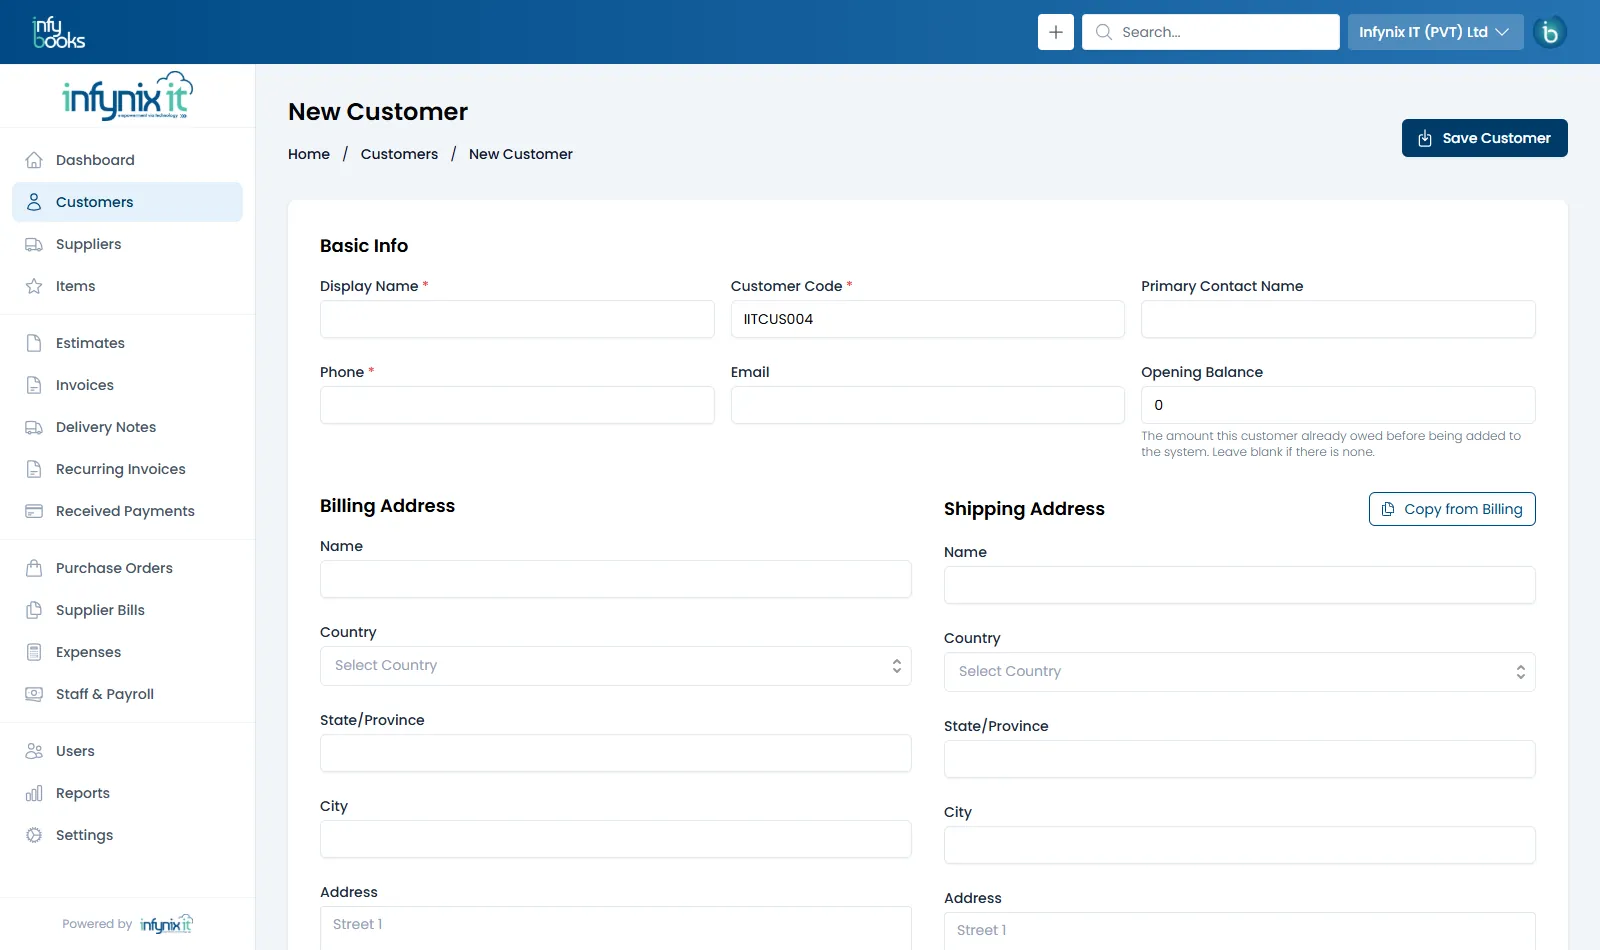
Fill in Basic Info. Only Display Name, Customer Code and Phone are required.
Fill in the Billing Address. If goods ship to the same place, click Copy from Billing to fill the Shipping Address.
Click Save Customer.
The New Customer form. The customer code is generated for you.
Field reference
Field
Description
Display Name*
The name shown on lists and printed on documents — usually the business name.
Customer Code*
A unique code such as CUS004, filled in automatically from the next number in your series. You can overwrite it. Change the format in Settings › Customization › Customers.
Primary Contact Name
The person you deal with at the business.
Phone*
Main contact number, printed on receipts.
Email
Where invoices, estimates and receipts are emailed when you use Send.
Opening Balance
The amount this customer already owed you before being added to InfyBooks. Leave blank if there is none. It counts towards their outstanding balance and statement.
Billing / Shipping Address
Name, country, state/province, city, street address, zip and phone. The billing address prints on invoices; the shipping address prints where your template shows it.
The customer view
Click a customer to open their profile. The left panel lists all customers with their outstanding balance, so you can move between them quickly. The profile has three tabs:
Overview — a Sales & Expenses chart for this customer (switch the period with the selector), totals for sales, receipts and net income, and their basic information.
Transactions — every estimate, invoice and payment for this customer.
Statement — a running account statement you can filter, print or download. See Customer statements.
Use New Transaction to start a New Estimate, New Invoice or New Payment with this customer already selected.
Import customers from CSV
Moving from a spreadsheet or another system? Import all your customers at once.
On the Customers list, click Import CSV.
Click Download Sample CSV and fill it in. Columns: Customer Code (optional — generated if blank), Name (required), Phone, Email, Company Name, Contact Name, Website, Tax ID, Opening Balance and Opening Balance Date.
Upload your file and click Import.
Review the summary. Rows with errors are listed so you can fix and re-import them with Import More.
Customer codes must be unique. Rows whose code already exists are skipped, so re-importing the same file won't create duplicates.
Deleting a customer
Deleting a customer also permanently deletes all of their invoices, estimates and payments. This can't be undone. If you simply stop working with a customer, leave the record in place so your reports stay accurate.
Suppliers are the businesses you buy from. Add them once and reuse them on purchase orders, supplier bills and expenses, so you always know what you owe and to whom.
In the app: Suppliers
Add a supplier
Go to Suppliers and click New Supplier.
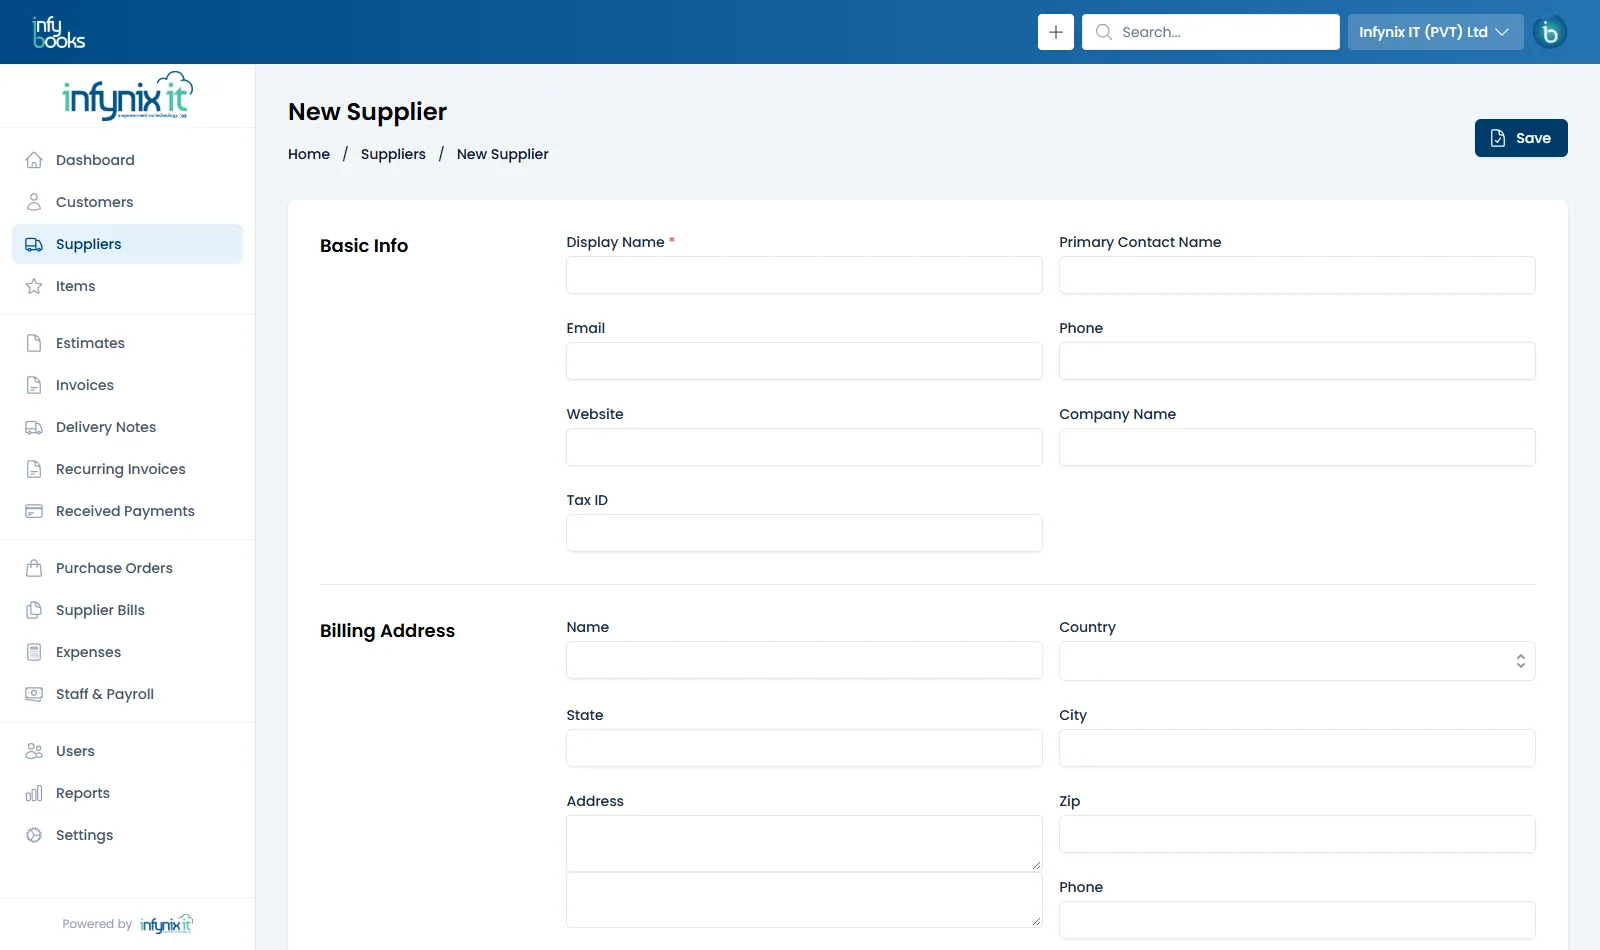
Enter the Display Name (the only required field) and any contact details.
Add the supplier's Tax ID if you need it on purchase orders.
Fill in the Billing Address and click Save.
The New Supplier form.
Field
Description
Display Name*
How the supplier appears in lists and on purchase documents.
Primary Contact Name
Your contact person at the supplier.
Email / Phone / Website
Contact details. The email is used when you send a purchase order or bill.
Company Name
The supplier's legal or registered name, if different from the display name.
Tax ID
The supplier's VAT or tax registration number.
Billing Address
Name, country, state, city, address, zip and phone.
Supplier Bills — recording what the supplier has invoiced you.
Expenses — tagging spending (including bill payments) to a supplier.
Their outstanding amounts roll up into Total Payables on the dashboard.
Deleting a supplier also permanently deletes their related expenses and payments.
Contacts & Items
Items
Items are the products and services you sell. Save them once with a price and description, then pick them from a dropdown on any estimate, invoice or recurring invoice.
In the app: Items
Add an item
Go to Items and click New Item.
Enter a Name and Selling Price (both required).
Choose a Unit such as pcs, kg, hour or month.
Optionally add a Description (formatted text that copies onto document lines) and an Image.
Click Save Item.
The New Item form.
Managing units
The unit list comes from Settings › Masters › Items. Click Add Item Unit to add your own (for example Site, Certificate or Year), or edit and delete existing ones.
Using items on documents
On a document's items table, click the item field and start typing — matching items appear, and choosing one fills in the price and description. You can still change the price, quantity or description for that one document without affecting the saved item.
Don't see the item you need? Click Add New Item at the bottom of the dropdown to create it in a pop-up without leaving the document.
Want different discounts on each line? Turn on Discount Per Item in Settings › Masters › Items. Want a tax on each line? Turn on Tax Per Item in Tax Types.
Sell
Estimates
An estimate (quotation) tells a customer what a job will cost before they commit. When they agree, convert it to an invoice in one click — no retyping.
In the app: Estimates
Create an estimate
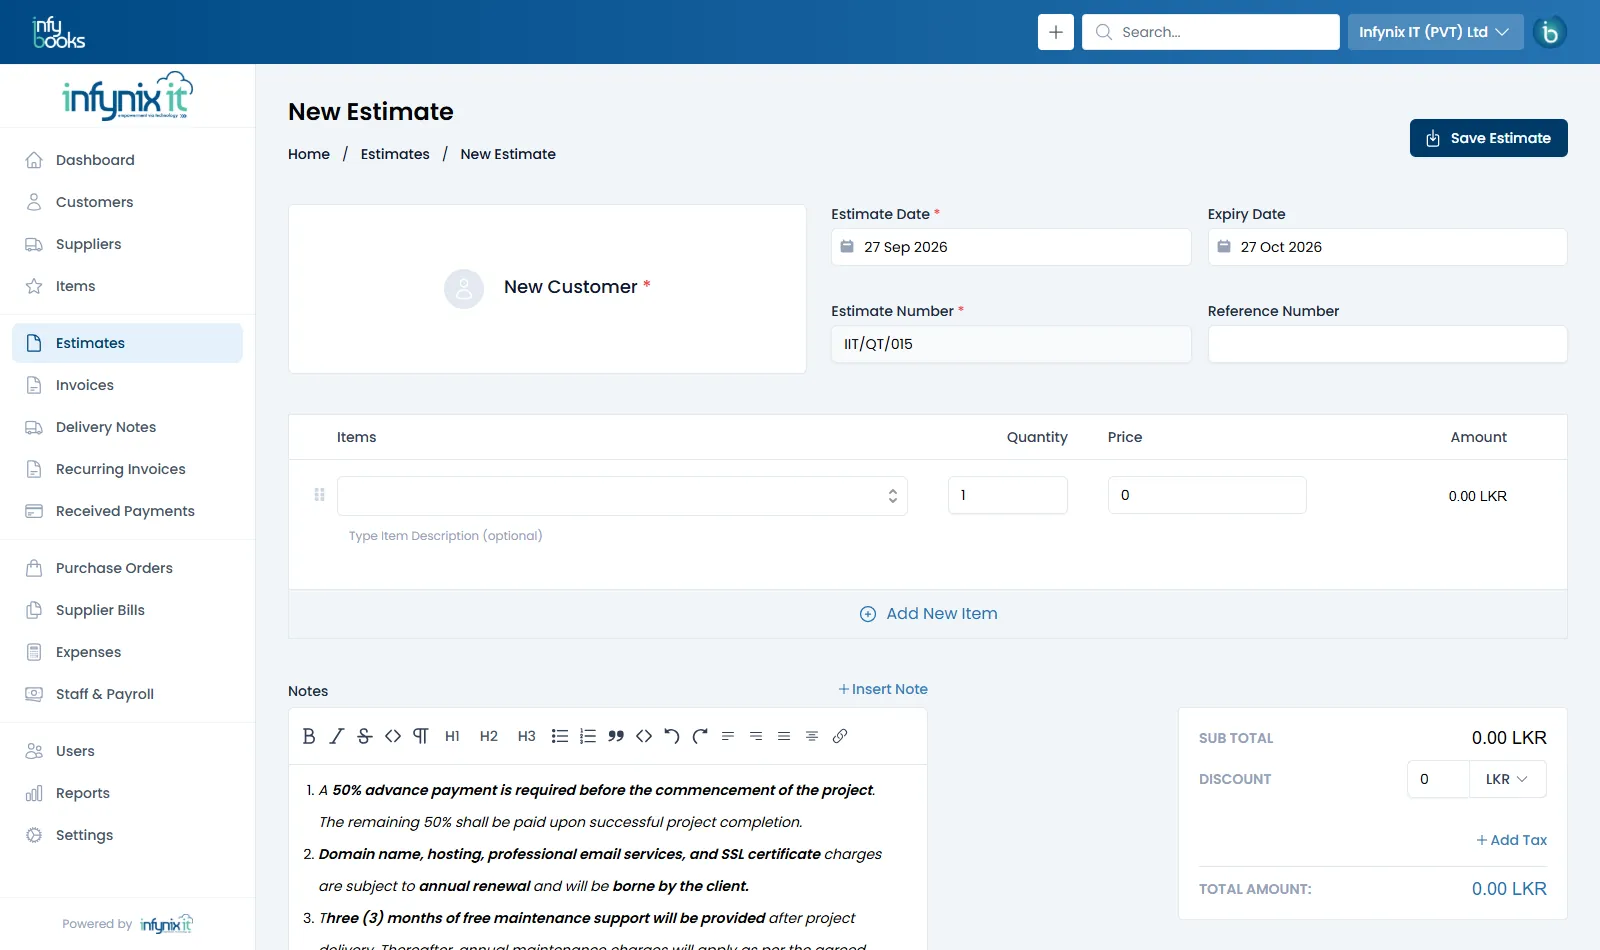
Go to Estimates › New Estimate, or use + › New Estimate.
Click New Customer and choose who the estimate is for.
Check the Estimate Date and Expiry Date. The expiry date is set automatically (for example 30 days later) — change it if your quote is valid for a different period.
The Estimate Number is filled in from your series. Add a Reference Number if the customer gave you one.
Add items, quantities and prices. Apply a Discount (fixed or %) and + Add Tax if needed.
Add your terms in Notes, or click + Insert Note to reuse saved terms and conditions.
Click Save Estimate.
A new estimate with saved terms inserted into Notes.
Send and follow up
From the estimate view you can:
Send Estimate — emails it to the customer with a link (or PDF attachment, depending on your email settings). You can edit the subject and message before sending.
Mark as Sent — if you shared it another way (WhatsApp, printout), record that it's been sent.
Copy URL or Download — share the link or PDF yourself.
When the customer replies, record their decision with Mark as Accepted or Mark as Rejected from the dropdown.
Estimate statuses
Status
Meaning
Draft
Saved but not yet sent to the customer.
Sent
Emailed or marked as sent.
Viewed
The customer has opened the estimate link.
Accepted
The customer agreed to the quote.
Rejected
The customer declined.
Expired
The expiry date passed without a decision.
Convert an estimate to an invoice
Open the estimate (or use the ⋯ menu on the list).
Choose Convert to Invoice and confirm.
InfyBooks creates a new invoice with the same customer, items, discounts and taxes, numbered from your invoice series. Review it and send it.
What happens to the estimate afterwards is up to you — leave it as is, mark it accepted, or delete it. Set this under Estimate Convert Action in Settings › Customization › Estimates, where you can also choose whether notes are copied to the invoice.
Clone an estimate
Quoting something similar for another customer? Choose Clone Estimate to make a copy with a new number, then change the customer and lines.
Sell
Invoices
Invoices are how you ask to be paid. InfyBooks numbers them, calculates totals and taxes, tracks due dates and updates the balance automatically as payments come in.
In the app: Invoices
Create an invoice
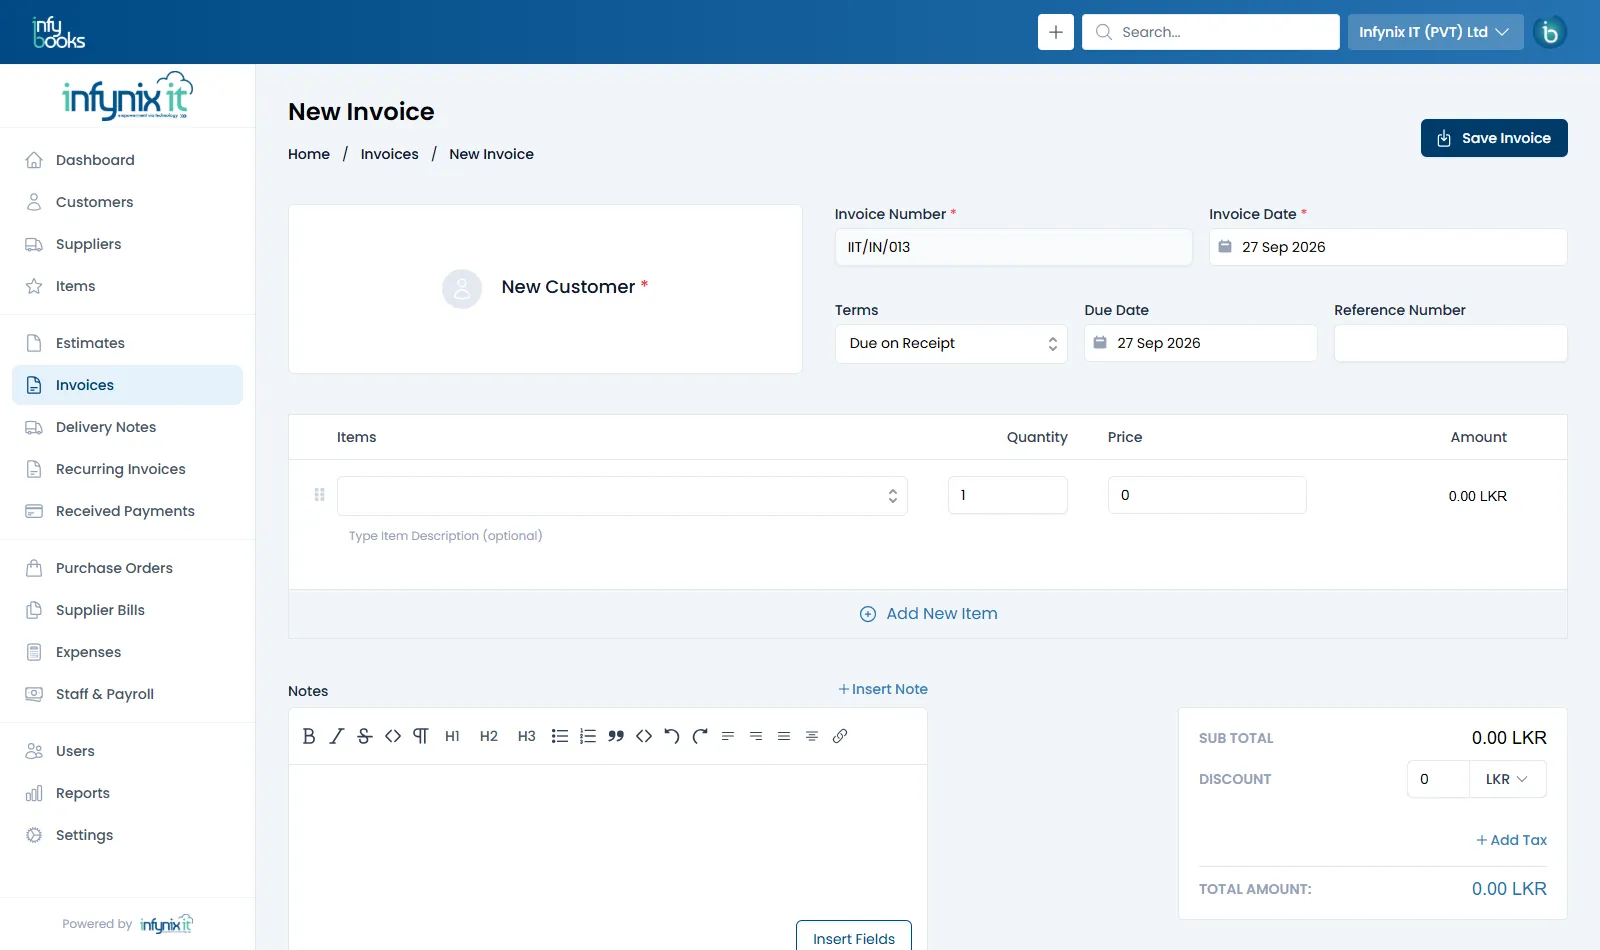
Go to Invoices › New Invoice, or use + › New Invoice.
Click New Customer and select the customer.
Check the Invoice Number and Invoice Date.
Pick Terms — the Due Date is calculated for you (you can still change it).
Add a Reference Number if needed, such as the customer's purchase order number.
Add line items. Choose saved items or type new ones, then set Quantity and Price.
Apply a Discount and + Add Tax as required, and add Notes such as bank details.
Click Save Invoice.
The New Invoice form.
Payment terms
Terms
Due date
Due on Receipt
Same day as the invoice date (the default).
Net 15 / 30 / 45 / 60
15, 30, 45 or 60 days after the invoice date.
Send and share
After saving you land on the invoice view with a live PDF preview. From here:
Send Invoice (from the ▾ dropdown) — email the invoice. You can edit the recipient, subject and message first.
Mark as Sent — record that you delivered it another way.
Copy URL — a public link the customer can open without logging in. Great for WhatsApp.
Download — save or print the PDF.
Create Delivery Note — raise a delivery note against this invoice. See Delivery Notes.
Clone Invoice — duplicate it with a new number.
Invoice statuses
An invoice has two kinds of status: where it is in the sending process, and how much has been paid.
Status
Meaning
Draft
Saved but not yet sent.
Sent
Emailed to the customer or marked as sent.
Viewed
The customer has opened the invoice link.
Unpaid / Partially Paid
Nothing, or only part, has been received.
Paid
Fully paid — the balance is zero.
Overdue by N days
The due date has passed and a balance remains.
The list's tabs — All, Draft, Sent and Due — help you work through each stage. The Balance column always shows what's still owed.
Record a payment against an invoice
Click Record Payment on the invoice view. The payment form opens with the customer and amount filled in. See Received Payments for the full walkthrough, including partial payments and advances.
Editing invoices
You can edit an invoice at any time unless your administrator has restricted it. Under Retrospective Edits in Settings › Customization › Invoices you can lock invoices once they're sent, partially paid or fully paid — useful where tax rules require finalised invoices to stay unchanged.
An invoice's total can't be reduced below what has already been paid. Delete or adjust the related payment first.
Import invoices from CSV
On the Invoices list, click Import CSV and download the sample file.
Fill in one row per invoice line. Rows sharing the same InvoiceNo become one invoice with several lines.
In the Customer column use the customer code (for example CUS005). If no code matches, InfyBooks tries the customer name.
Upload and click Import. Any rows with errors are listed for you to fix.
Customers must exist before you import their invoices, and every invoice number must be unique. Import customers first.
Sell
Recurring Invoices
For retainers, rent, subscriptions and instalment plans. Set up a schedule once and InfyBooks creates — and optionally emails — a new invoice every period.
In the app: Recurring Invoices
How it works
A recurring invoice is a schedule, not an invoice. It stores who to bill, what to bill and how often. On each run it creates a normal invoice, which takes the next number from your invoice series and appears in Invoices like any other. That's why the recurring profile itself has no invoice number.
Set up a recurring invoice
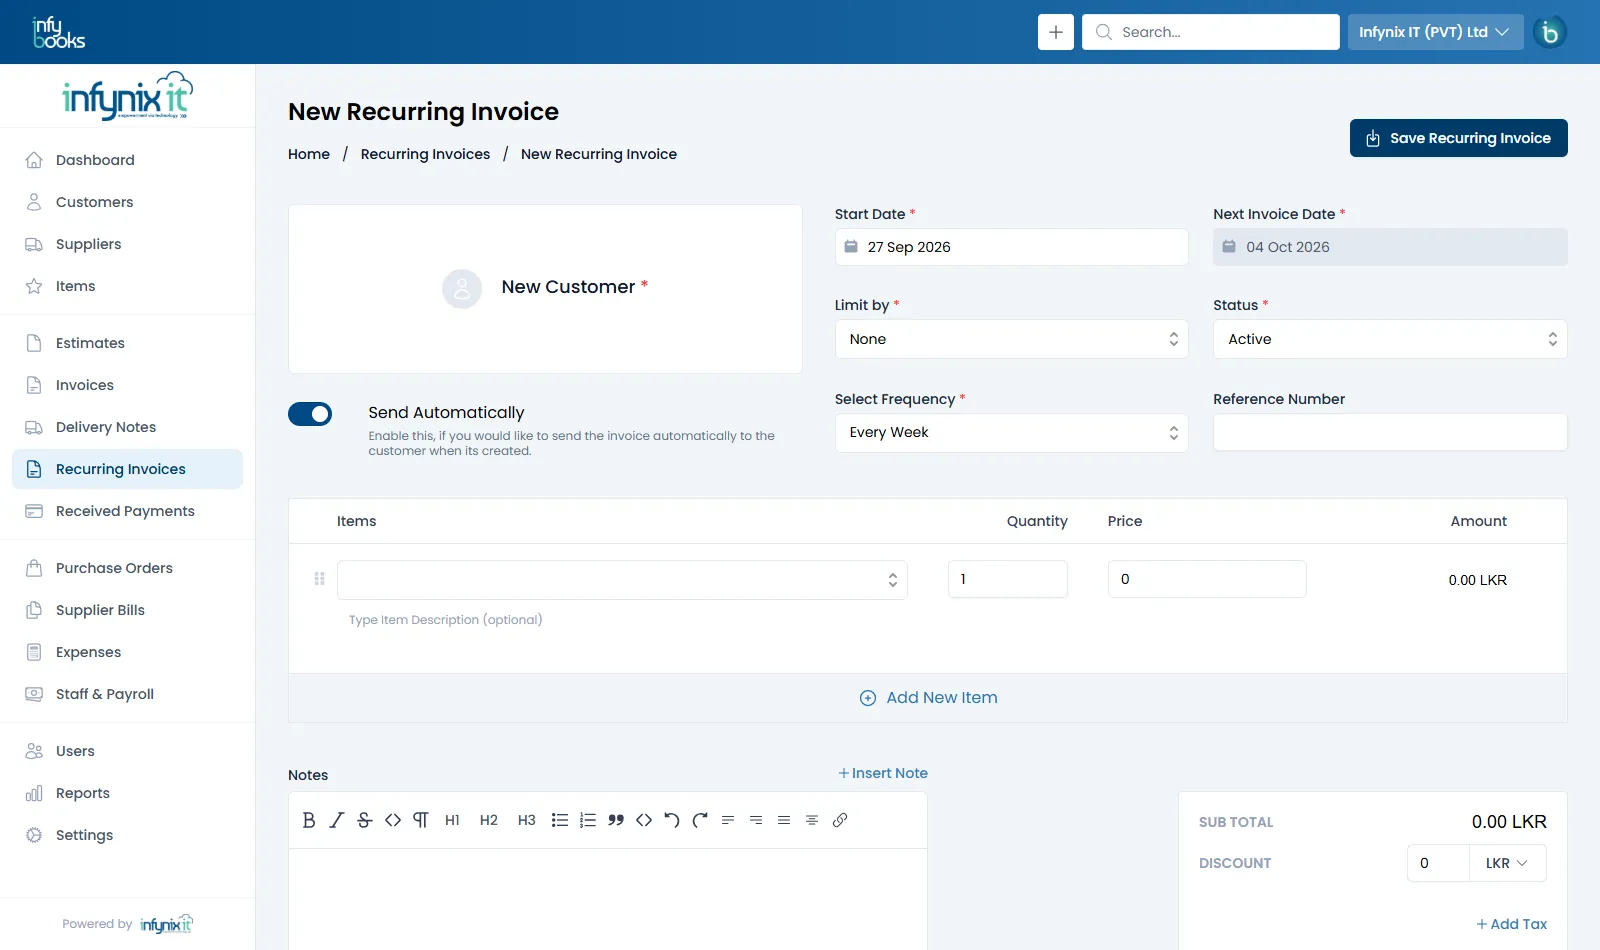
Go to Recurring Invoices › New Recurring Invoice.
Choose the customer.
Set the Start Date. The Next Invoice Date is worked out from the start date and frequency.
Choose a Frequency (see below).
Choose Limit by — when the schedule should stop.
Leave Status on Active, or set On Hold to save it without starting.
Turn on Send Automatically if each new invoice should be emailed to the customer as soon as it's created.
Add the items, discount, taxes and notes to copy onto every invoice, then click Save Recurring Invoice.
A weekly recurring invoice with Send Automatically switched on.
Frequency options
Every Minute, Every 30 Minutes, Every Hour, Every 2 Hours, Every day at midnight, Every Week, Every 15 days at midnight, On the first day of every month, Every 6 Months, Every year on 1 January, or Custom — where you enter a schedule in cron format (minute, hour, day of month, month, day of week) for anything else, such as "the 25th of every month".
Limit by
Option
Behaviour
Good for
None
Runs until you pause or delete it.
Ongoing retainers, rent, subscriptions
Count
Stops after a set number of invoices.
A 12-month instalment plan
Date
Stops on a chosen end date.
A fixed-term service contract
Statuses
Status
Meaning
Active
Running — the next invoice will be created on the next invoice date.
On Hold
Paused by you. No invoices are created until you set it back to Active.
Completed
The count or end date has been reached. No more invoices will be created.
Tracking generated invoices
Open a recurring invoice to see every invoice it has created, with numbers, dates, statuses and amounts due. The generated invoices also appear in Invoices, where you record payments against them as usual. Their due date follows the Invoice Due after days setting in Customization.
Leave Send Automatically off while you're getting started. Each invoice will wait for you to review and send, and you can switch it on once you trust the setup.
Sell
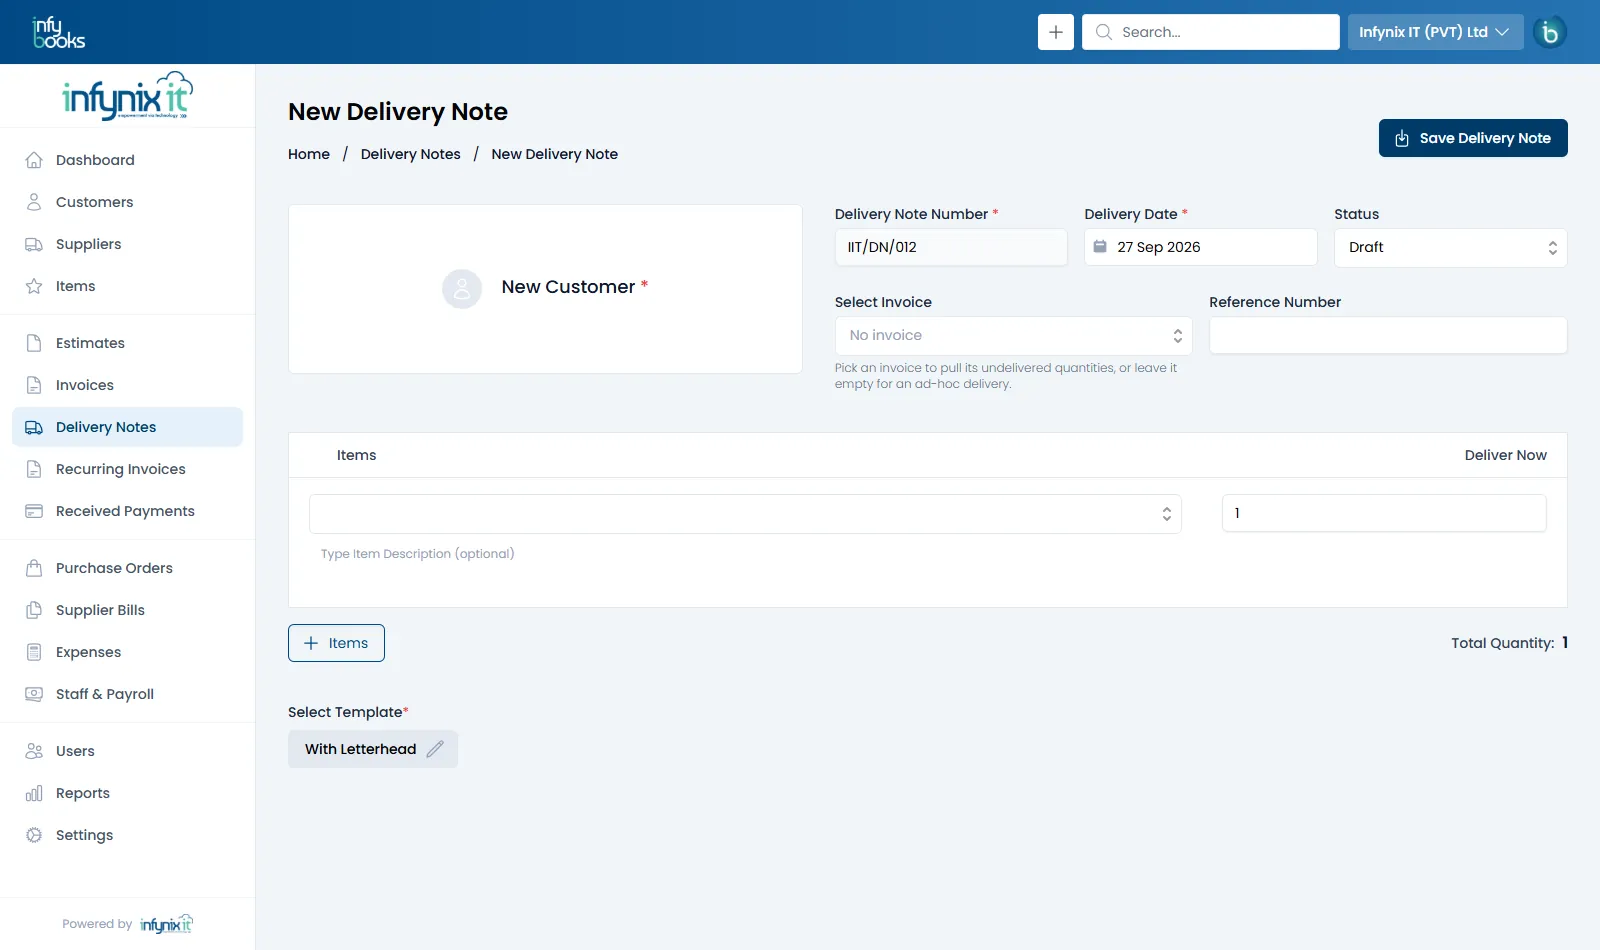
Delivery Notes
A delivery note records what physically left your premises — separately from what you billed. Deliver an invoice in one go or in several part-shipments, and InfyBooks keeps count of what's still to go.
In the app: Delivery Notes
Create a delivery note
Either click Create Delivery Note on an invoice, or go to Delivery Notes › New Delivery Note.
Choose the customer.
Check the Delivery Note Number and Delivery Date.
Under Select Invoice, pick the invoice you're delivering against. Its lines load with Ordered, Already Delivered and Remaining quantities. Leave it empty for an ad-hoc delivery that isn't tied to an invoice.
Enter the quantity for each line in Deliver Now, or use Deliver all remaining.
Add a Reference Number, and details such as who delivered it, who received it and the vehicle number if you track them.
Choose a template (for example With Letterhead) and click Save Delivery Note.
Pick an invoice to pull in its undelivered quantities.
Statuses and actions
Status
Meaning
Draft
Being prepared. Still editable.
Sent
Dispatched / shared with the customer (Mark as sent).
Delivered
The customer has received the goods (Mark as delivered). It can no longer be edited.
Cancelled
Cancelled (Cancel delivery note). Its quantities are released so they can be delivered again.
Delivery status on the invoice
Each invoice shows its delivery progress — Not Delivered, Partially Delivered or Fully Delivered — along with the delivery notes raised against it. Once everything is delivered, InfyBooks won't let you over-deliver.
Sell
Received Payments
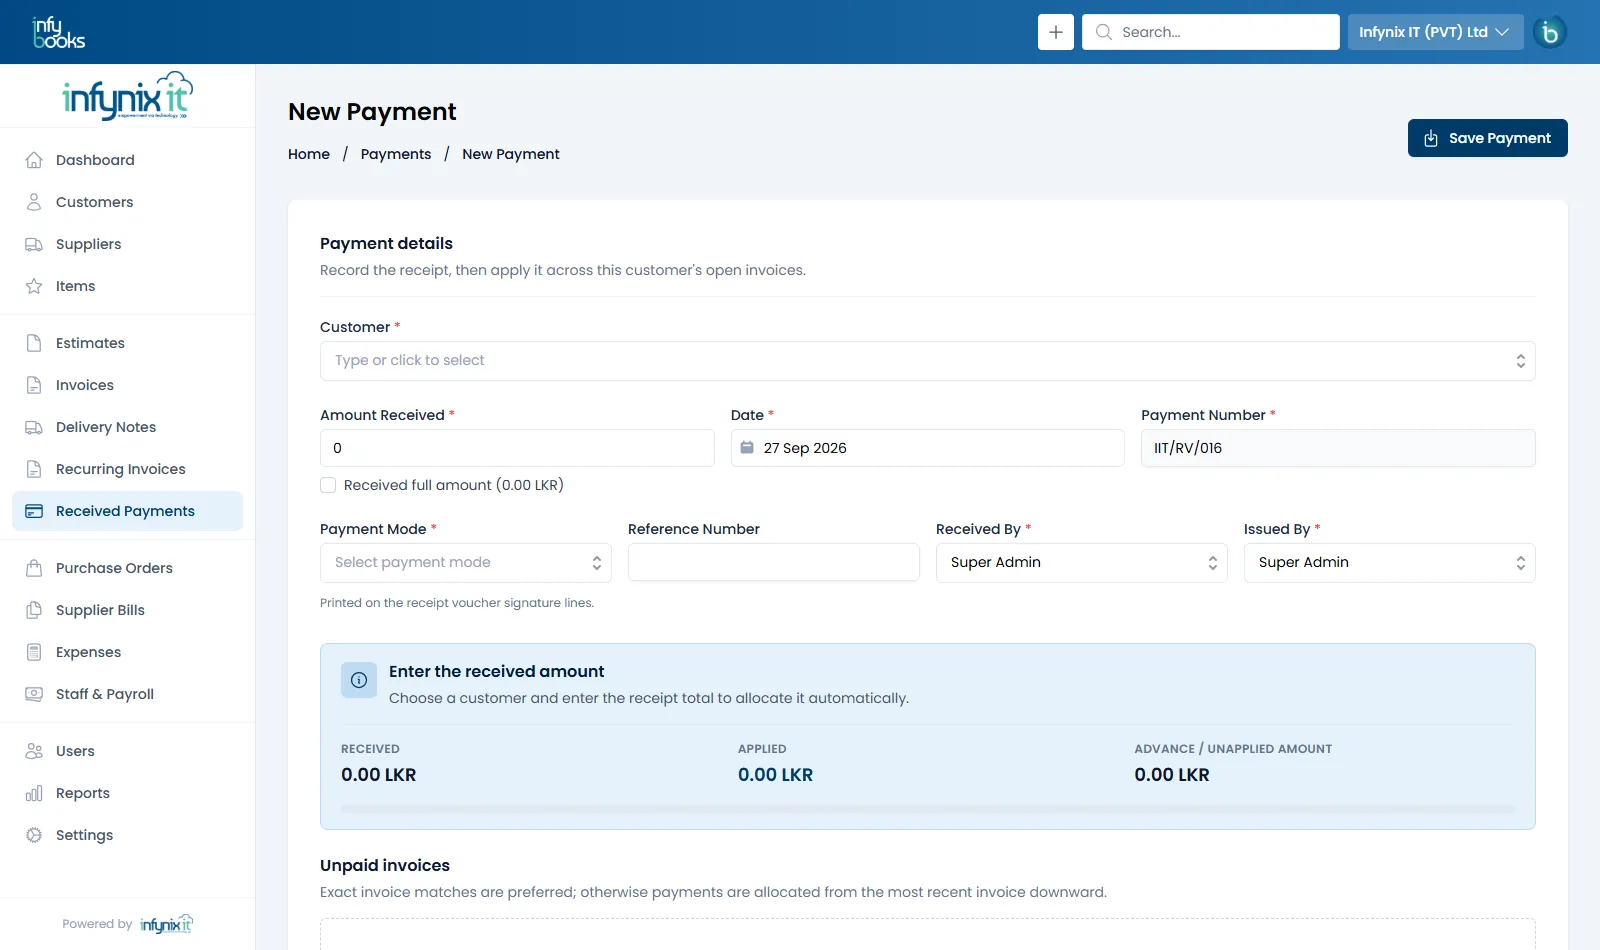
Record money you receive from customers. Enter one total and InfyBooks applies it across the customer's open invoices for you, keeps any extra as an advance, and produces a branded receipt voucher.
In the app: Received Payments
Record a payment
Go to Received Payments › New Payment, or click Record Payment on an invoice.
Select the Customer. Their unpaid invoices load below.
Enter the Amount Received, or tick Received full amount to fill in their total balance.
Check the Date and Payment Number.
Choose the Payment Mode (cash, bank transfer, cheque, card…) and add a Reference Number such as a cheque or transfer ID.
Choose Received By and Issued By. These names print on the signature lines of the receipt voucher.
Review how the amount has been applied to invoices (below), then click Save Payment.
The allocation panel shows Received, Applied and Advance / Unapplied amounts as you type.
How payments are applied to invoices
When you enter the amount, InfyBooks allocates it automatically:
If the amount exactly matches one open invoice, it's applied to that invoice.
Otherwise it's applied starting from the most recent invoice downward until the money runs out.
The summary panel shows the Received total, how much is Applied, and any Advance / Unapplied Amount. You can adjust the amount applied to each invoice in the Unpaid invoices list before saving.
Advances
If the customer pays more than they owe — or has no unpaid invoices at all — the extra is saved as advance credit for that customer, ready to apply to a future invoice.
Receipt vouchers
Every payment has a printable Receipt Voucher showing the receipt number, date, amount (in figures and in words), who it was received from, the payment mode, the invoices it paid, and the Received By / Issued By signature lines. From the payment view you can:
Send Payment Receipt — email the receipt to the customer.
Download, View or Copy URL — share it yourself.
Edit or Delete — balances on the affected invoices update automatically.
Setting up Received By / Issued By
These lists come from Settings › Masters › Signatories. Add the names of the people who handle payments there — or click Add Signatory directly from the payment form.
Payment modes
Cash, Cheque, Credit Card and Bank Transfer are ready to use. Add your own — for example a specific bank account or mobile wallet — under Settings › Masters › Payment Modes.
Sell
Customer Statements
A statement is a single page that shows a customer everything they've been invoiced, everything they've paid, and what they still owe. Send one whenever there's a question about a balance.
In the app: Customers › Statement
Generate a statement
Open Customers and click the customer.
Open the Statement tab.
Choose Filter by: All (every transaction) or Outstanding (only what's still unpaid).
Pick a Date Range, or set a custom From and To date.
Click Download for a PDF, or Print.
The statement includes the customer's opening balance, each invoice and payment in date order, and the running balance.
Statements from Reports
You can also produce a statement from Reports › Sales Customer Statement, which is handy when you're already reviewing other reports. See Reports.
Before a collections call, send an Outstanding statement. It lists only the unpaid invoices, so the conversation starts with the exact amount.
Purchase
Purchase Orders
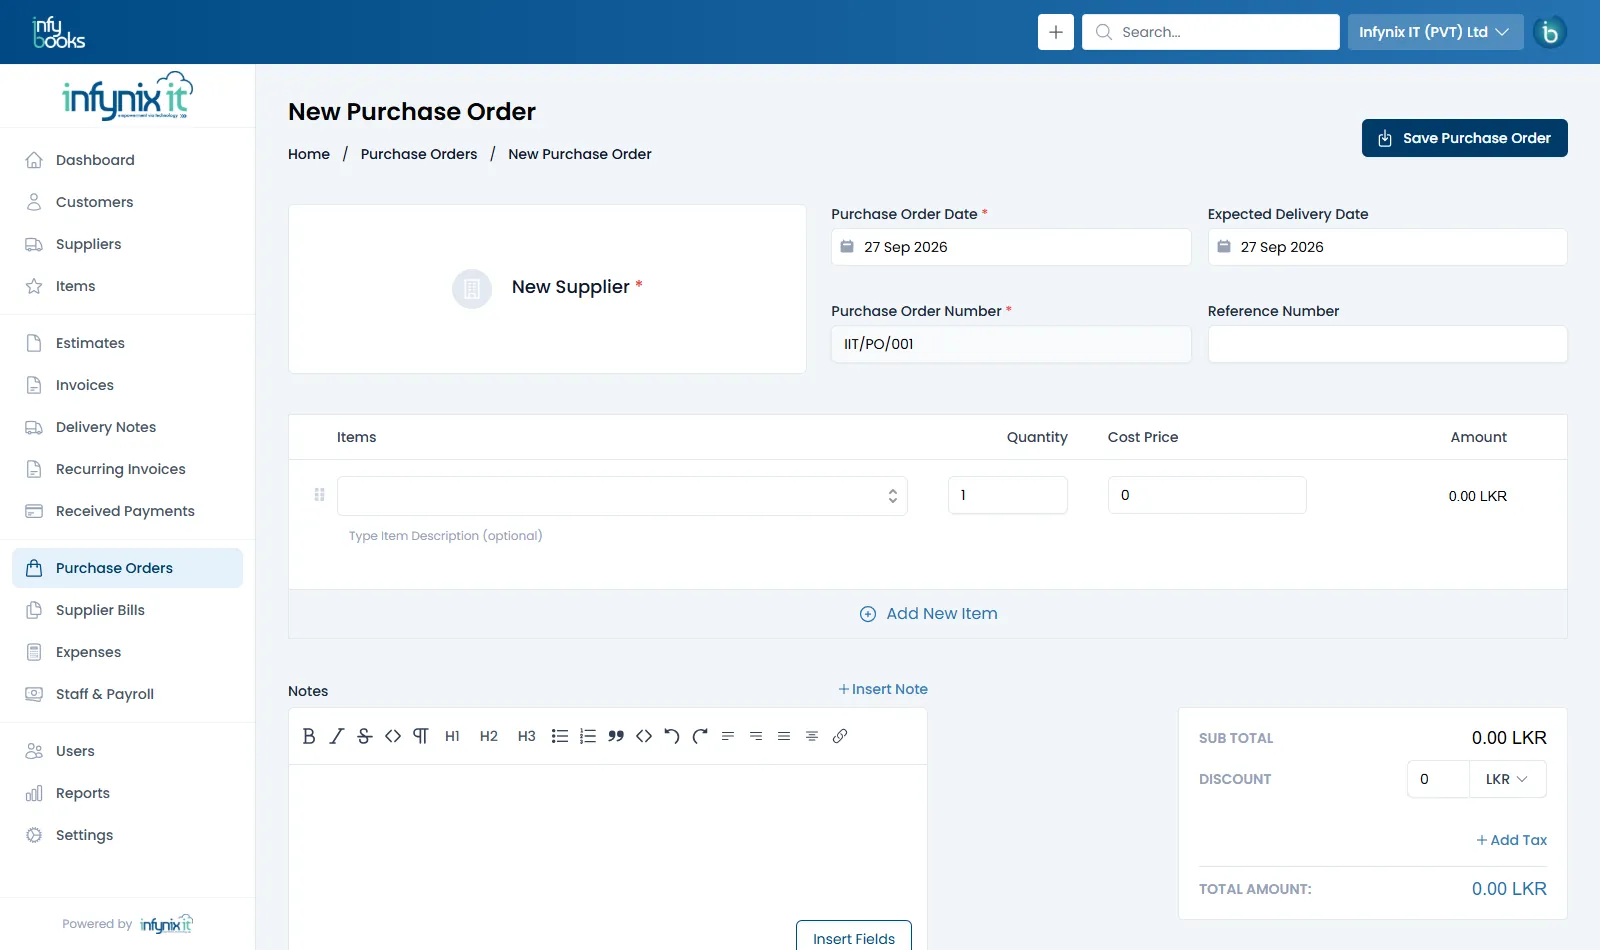
Raise a purchase order (PO) before you buy, so you and your supplier agree on items, quantities and prices up front. When the goods arrive and the supplier invoices you, convert the PO into a supplier bill.
In the app: Purchase Orders
Create a purchase order
Go to Purchase Orders › New Purchase Order.
Click New Supplier and choose the supplier (or create one).
Set the Purchase Order Date and, optionally, the Expected Delivery Date.
The Purchase Order Number comes from your PO series. Add a Reference Number if the supplier quoted one.
Add the items with Quantity and Cost Price — what you're paying, not your selling price.
Add any discount, taxes and delivery instructions in Notes, then click Save Purchase Order.
Emails the PO to the supplier. The status becomes Sent.
Mark as Sent
Records that you shared the PO another way.
Mark as Received
Records that the goods or services have arrived. Status: Received.
Convert to Supplier Bill
Creates a supplier bill with the same supplier and lines, ready for you to add the supplier's bill number and due date.
Mark as Cancelled
Cancels the order if it won't go ahead. Status: Cancelled.
Clone Purchase Order
Copies the PO with a new number — handy for repeat orders.
Converting a PO rather than typing the bill from scratch keeps the two linked, and makes it easy to spot when a supplier bills you for something you never ordered.
Purchase
Supplier Bills
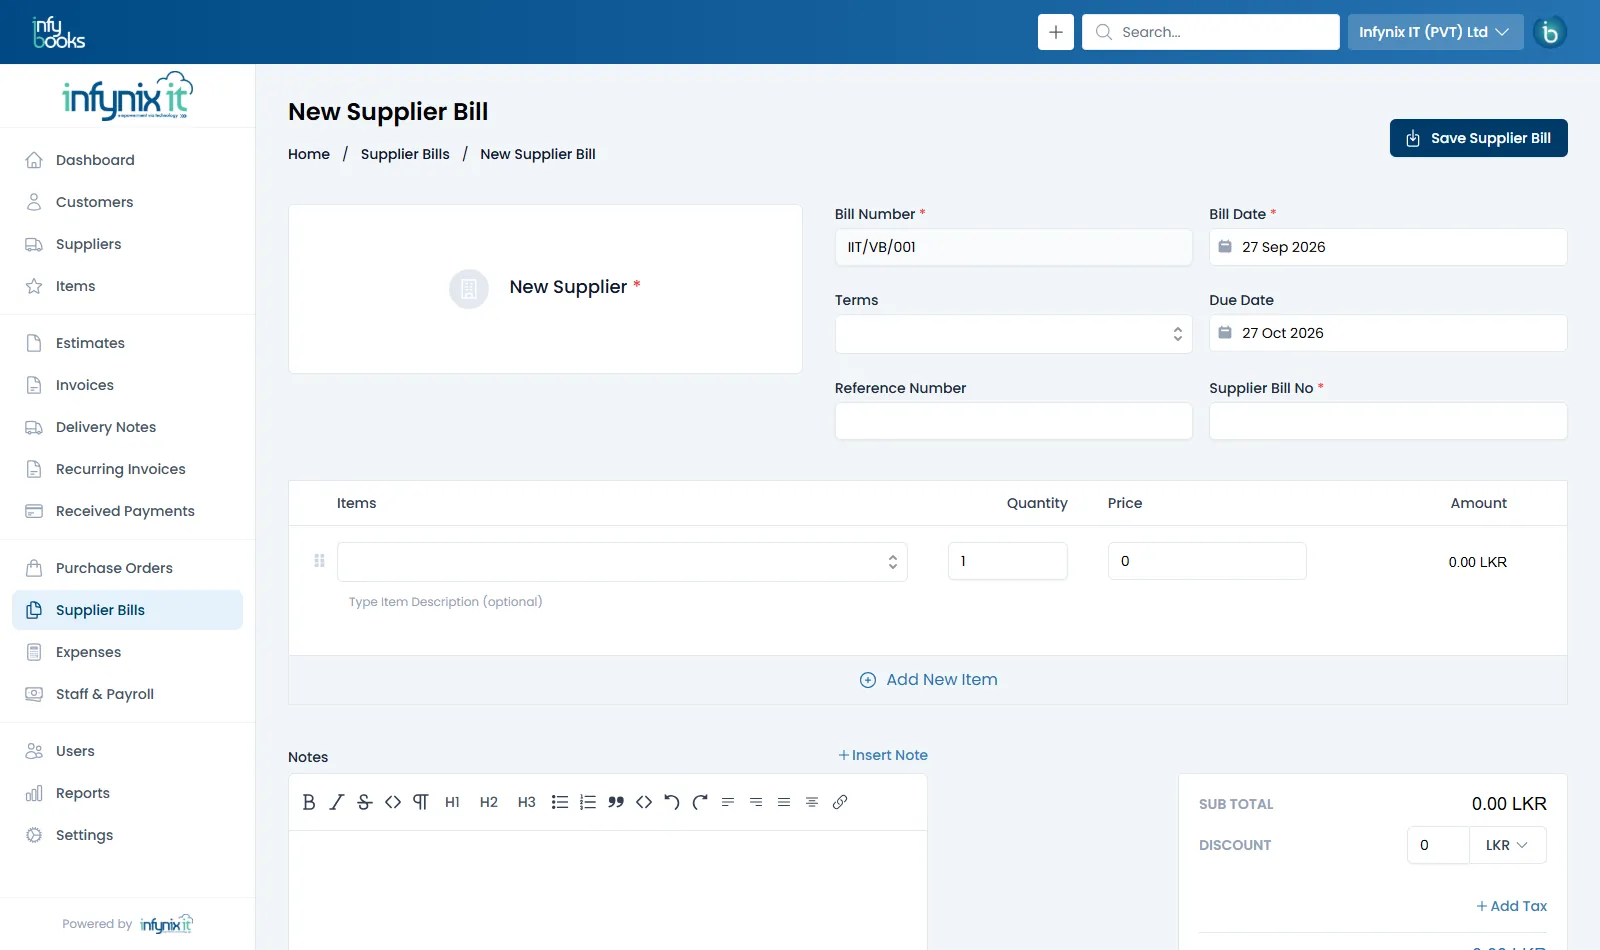
A supplier bill records an invoice you've received from a supplier — what you owe, and when it's due. Open bills make up Total Payables on your dashboard.
In the app: Supplier Bills
Record a supplier bill
Go to Supplier Bills › New Supplier Bill, or convert a purchase order.
Choose the supplier.
Enter the Supplier Bill No — the invoice number printed on the supplier's bill. This is required so you can match it later.
Check the Bill Number (your own internal number, from your series) and the Bill Date.
Choose Terms or set the Due Date directly.
Add the billed items, quantities and prices, plus any discount and tax, then click Save Supplier Bill.
Bill Number is yours; Supplier Bill No is the supplier's.
Statuses
Status
Meaning
Draft
Entered but not yet confirmed. Use Mark as Sent once the bill is final.
Sent / Viewed
Confirmed and open for payment.
Unpaid / Partially Paid
Some or all of the bill is still owed.
Paid
Settled in full.
Pay a supplier bill
Payments to suppliers are recorded as expenses linked to the bill:
Open the bill. If it's still a draft, choose Mark as Sent first.
Click Record Payment. A new expense opens with the supplier and bill already selected, showing the amount due.
Enter the amount you paid, the date and the payment mode, attach the payment slip if you have one, and save.
The bill's balance and status update automatically. Pay in instalments by recording several payments.
Purchase
Expenses
Record money going out — rent, utilities, fuel, supplier payments — with a category and a photo of the receipt. Expenses feed your Net Income on the dashboard and your Profit & Loss report.
In the app: Expenses
Record an expense
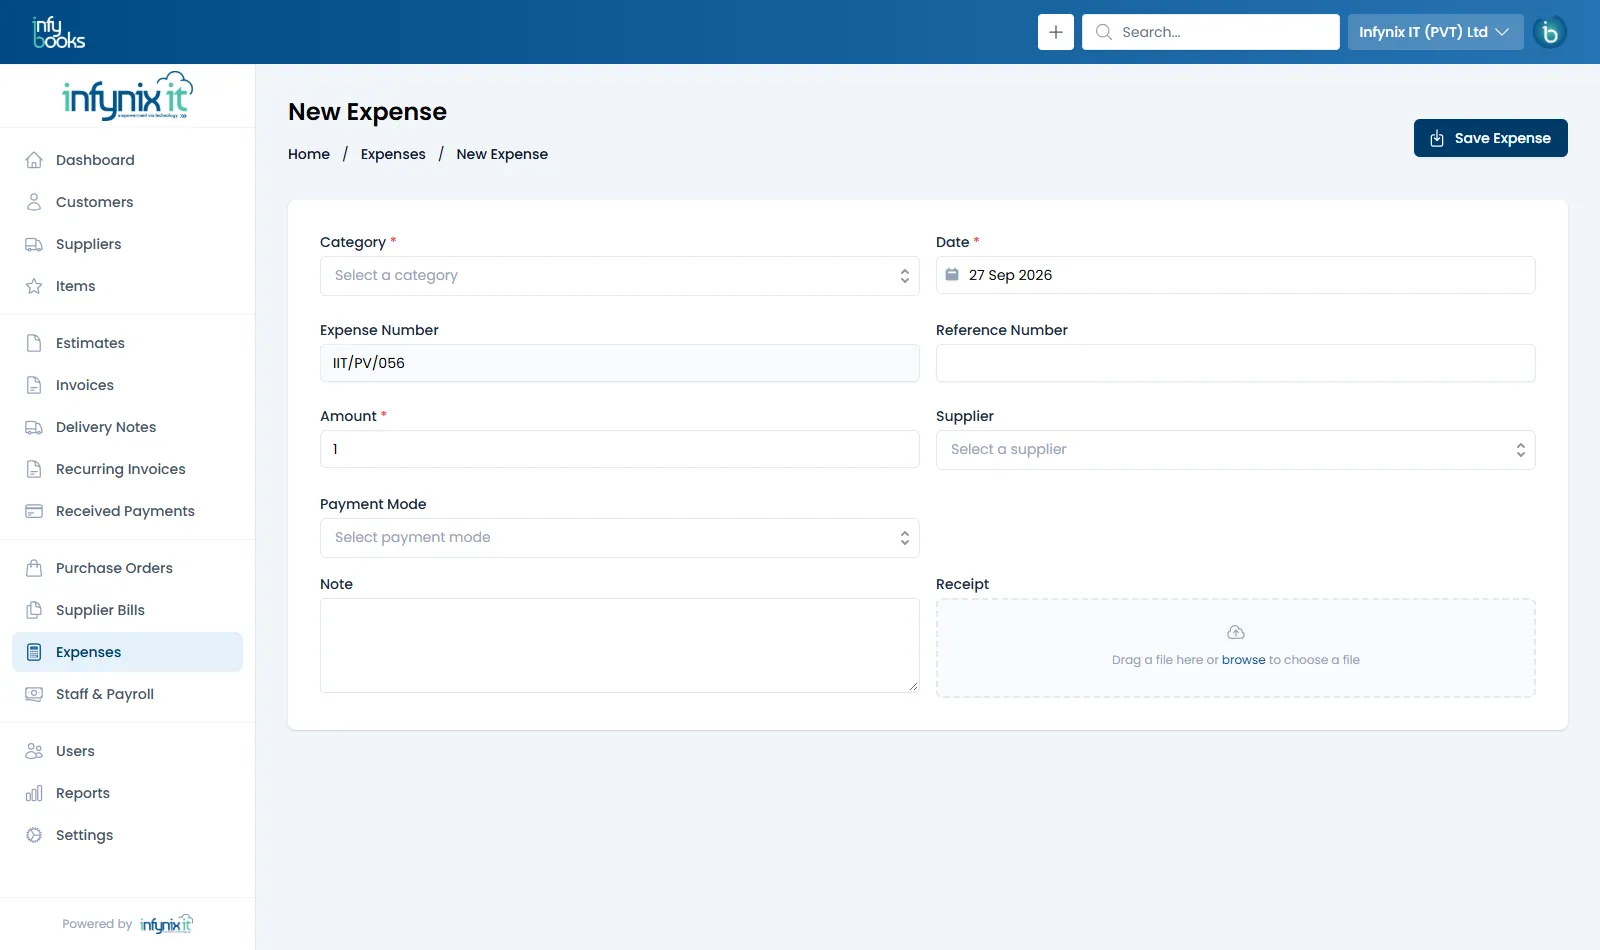
Go to Expenses › New Expense.
Choose a Category and the Date (both required).
Enter the Amount. The Expense Number is generated from your series.
Optionally choose the Supplier and Payment Mode, and add a Reference Number.
Add a Note and drag the Receipt (photo or PDF) into the upload box.
Click Save Expense.
Attach receipts so they're always a click away.
Expense categories
Categories group your spending in reports — for example Rent, Utilities, Travel, Salaries & Wages. Manage them in Settings › Masters › Expense Categories. Keep the list short and meaningful; you can always add more later.
Finding expenses
Use Filter on the list to narrow by supplier, category, expense number or a from/to date range. Open an expense to edit it or Download Receipt.
Expenses InfyBooks creates for you
Supplier bill payments — when you use Record Payment on a supplier bill.
Salaries — when a monthly salary is marked Paid, its net pay is recorded under Salaries & Wages. See Monthly salaries.
Salary advances — each advance you give a staff member is recorded as it's paid out.
Don't also enter salaries or advances by hand in Expenses — they'd be counted twice in your Profit & Loss.
Staff & Payroll
Managing staff
Staff & Payroll is InfyBooks' built-in payroll. Start by adding each employee with their basic salary — everything else (monthly salaries, overtime, advances, payslips) builds on these records.
In the app: Staff & Payroll › Staffs
The Staff & Payroll screen
Tab
Use it to
Staffs
Add and manage employees, and open each person's transaction ledger.
Monthly Salaries
Create each month's salary and mark it paid. See Monthly salaries.
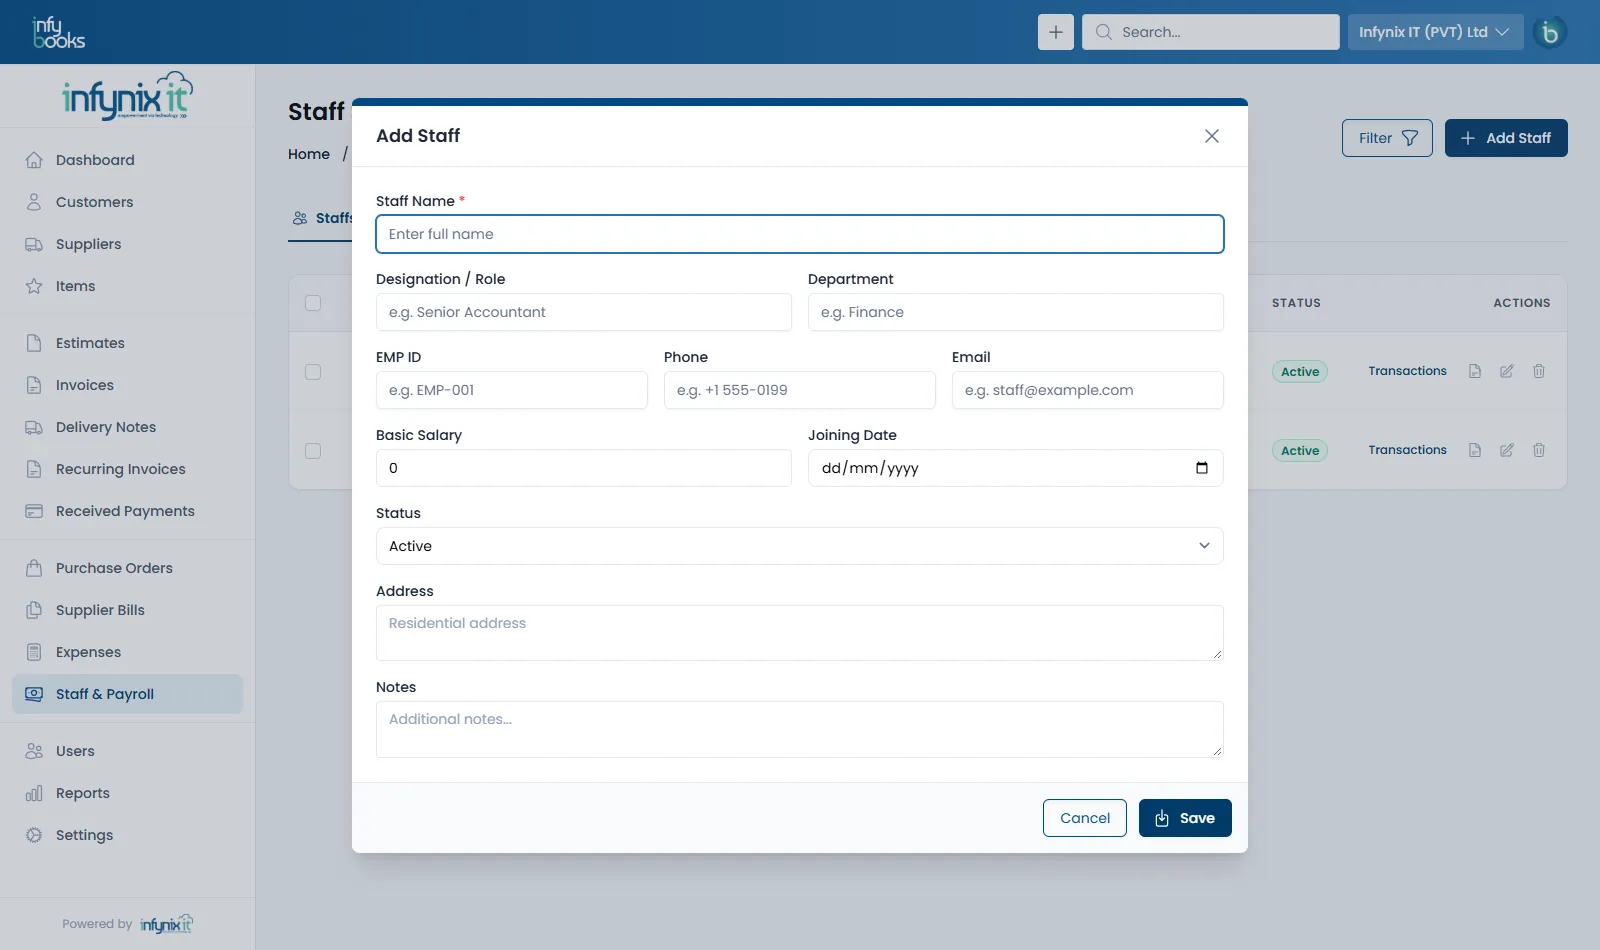
Enter an EMP ID — your employee number. It must be unique in your company.
Add Phone, Email and Address.
Enter the monthly Basic Salary and the Joining Date.
Leave Status on Active and click Save.
The Add Staff dialog.
The staff list
Each row shows the employee's name, designation and department, contact details, Basic Salary per month, Total Paid to date, any Outstanding Advance, and their status. From the row you can:
Transactions — open the staff ledger: every salary accrued, every payment and advance, with a running advance balance.
Statement PDF (document icon) — download that ledger as a PDF.
Edit or Delete the staff member.
Tick several rows to delete in bulk, and use Filter to find people by name or EMP ID.
When someone leaves, set their status to Inactive instead of deleting them. Their salary history stays intact for reports and statements.
Staff & Payroll
Monthly salaries
Create one salary record per staff member per month. InfyBooks brings in their basic salary and any outstanding advance, works out overtime, adds allowances, subtracts deductions and gives you the net pay.
In the app: Staff & Payroll › Monthly Salaries
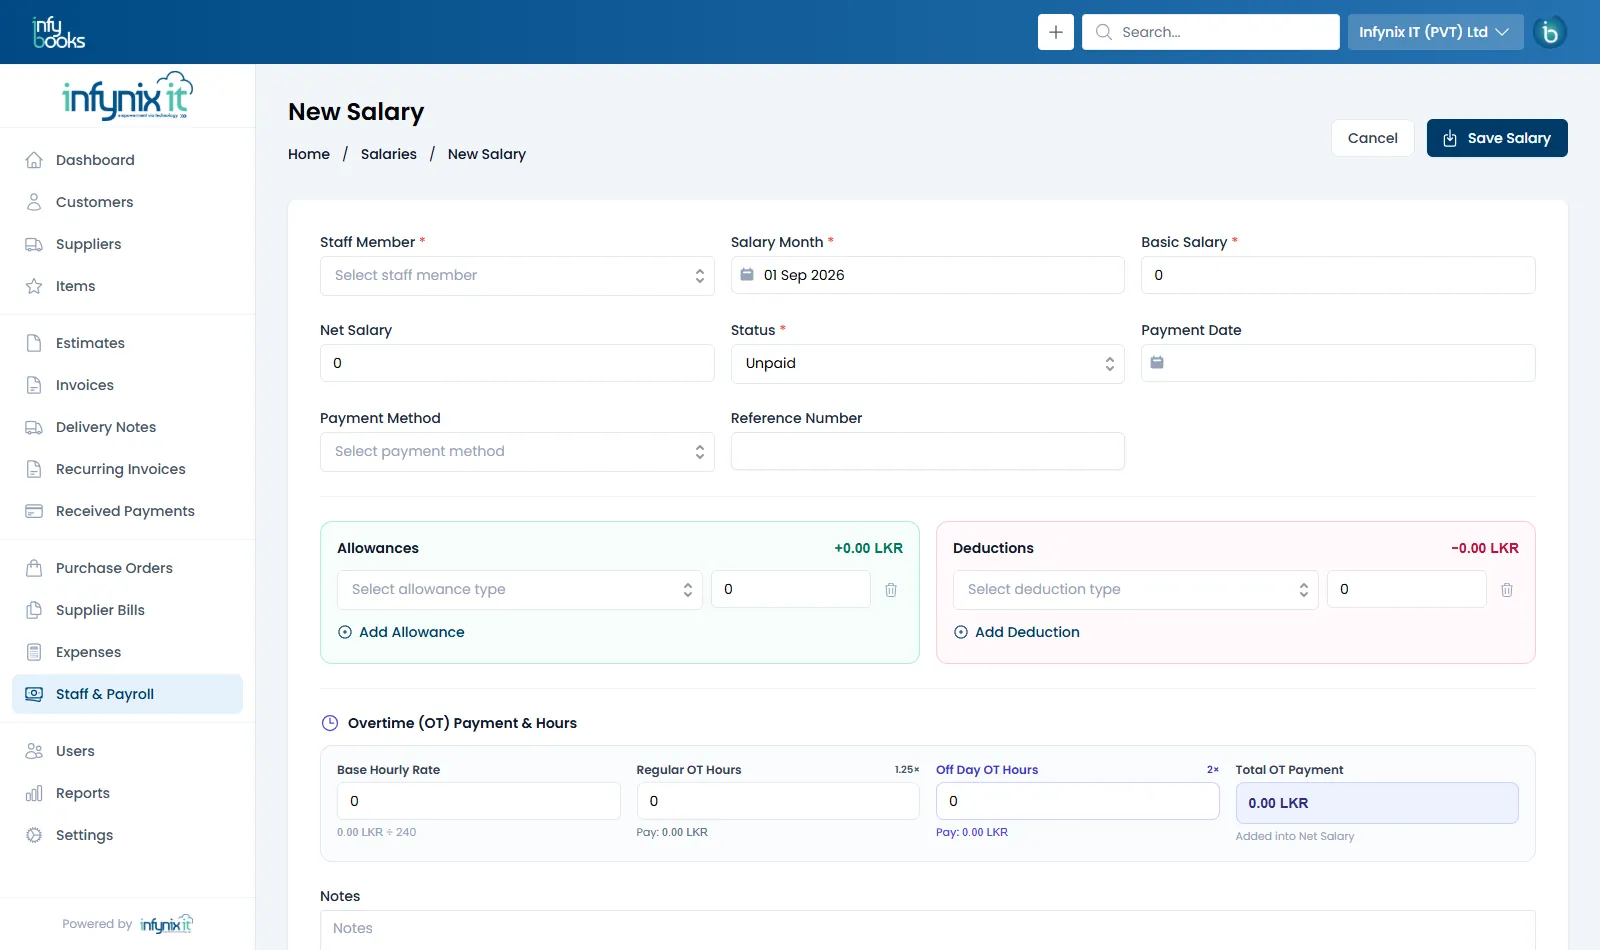
Create a salary
Open the Monthly Salaries tab and click Add Salary.
Choose the Staff Member. Their Basic Salary fills in automatically, and any outstanding advance appears.
Set the Salary Month.
Under Allowances, pick a type (for example Transport) and amount. Click Add Allowance for more.
Under Deductions, add anything to subtract, such as an absence or insurance.
Enter overtime hours in the Overtime (OT) section (see below).
Check the Net Salary, choose a Status (Unpaid or Paid), and if paid add the Payment Date, Payment Method and Reference Number.
Click Save Salary.
Allowances, deductions and overtime all feed the net salary.
Regular OT pay = Regular OT Hours × Hourly Rate × 1.25
Off-day OT pay = Off Day OT Hours × Hourly Rate × 2
Total OT Payment = Regular OT pay + Off-day OT pay → added to Net Salary
Example: basic salary 48,000, divisor 240 → hourly rate 200. Ten regular OT hours pay 10 × 200 × 1.25 = 2,500. Four off-day hours pay 4 × 200 × 2 = 1,600. Total overtime: 4,100.
The Base Hourly Rate is filled in for you but you can override it for a particular month.
Recovering advances
If the staff member has an outstanding advance, an Advance Deduction line appears showing the current outstanding amount. Enter how much to recover this month, or click Deduct Full Advance. The advance's recovery status updates when you save. See Salary advances.
Marking salaries as paid
Set the status to Paid on the salary form, or on the Monthly Salaries list tick several salaries and use Mark as Paid / Mark as Unpaid to update them together. If a salary has no payment date when you mark it paid from the list, today's date is used.
Salaries in your books
When a salary is marked Paid, InfyBooks automatically records its net pay as an expense in the Salaries & Wages category (created for you if it doesn't exist). Mark it unpaid again, or delete it, and the expense is removed. Your dashboard and Profit & Loss therefore always include payroll — with no double entry.
Payslips
Each salary has a Payslip PDF showing the employee's details (EMP ID, designation, department), earnings (basic salary, allowances, overtime), deductions (including any advance recovered), the payment date and the net pay — ready to print or hand to the employee.
Staff & Payroll
Salary advances
Record money you give a staff member before payday. InfyBooks tracks the outstanding balance and lets you recover it — in full or in instalments — from future salaries.
In the app: Staff & Payroll › Advances
Record an advance
Open the Advances tab and click Record Advance.
Choose the Staff Member.
Enter the Advance Date and Advance Amount.
Choose the Payment Method and add a Reference Number (for example a transfer ID) and Notes.
Click Save. The advance will be deducted from monthly salary.
Recovery status
Status
Meaning
Unrecovered
Nothing has been deducted from salary yet.
Partially Recovered
Part of the advance has been deducted; a balance remains.
Fully Recovered
The whole advance has been deducted.
Recovery happens on the salary form through the Advance Deduction line. The staff list and each staff member's ledger always show the current Outstanding Advance.
Advances in your books
Each advance is recorded as an expense when you give it, and the salary that recovers it pays out less. The total cost of that employee in your books is therefore correct — never counted twice.
Staff & Payroll
Payroll configuration
Set your overtime rules and the allowance and deduction types that appear on every salary. Do this once, before running your first payroll.
In the app: Staff & Payroll › Configuration
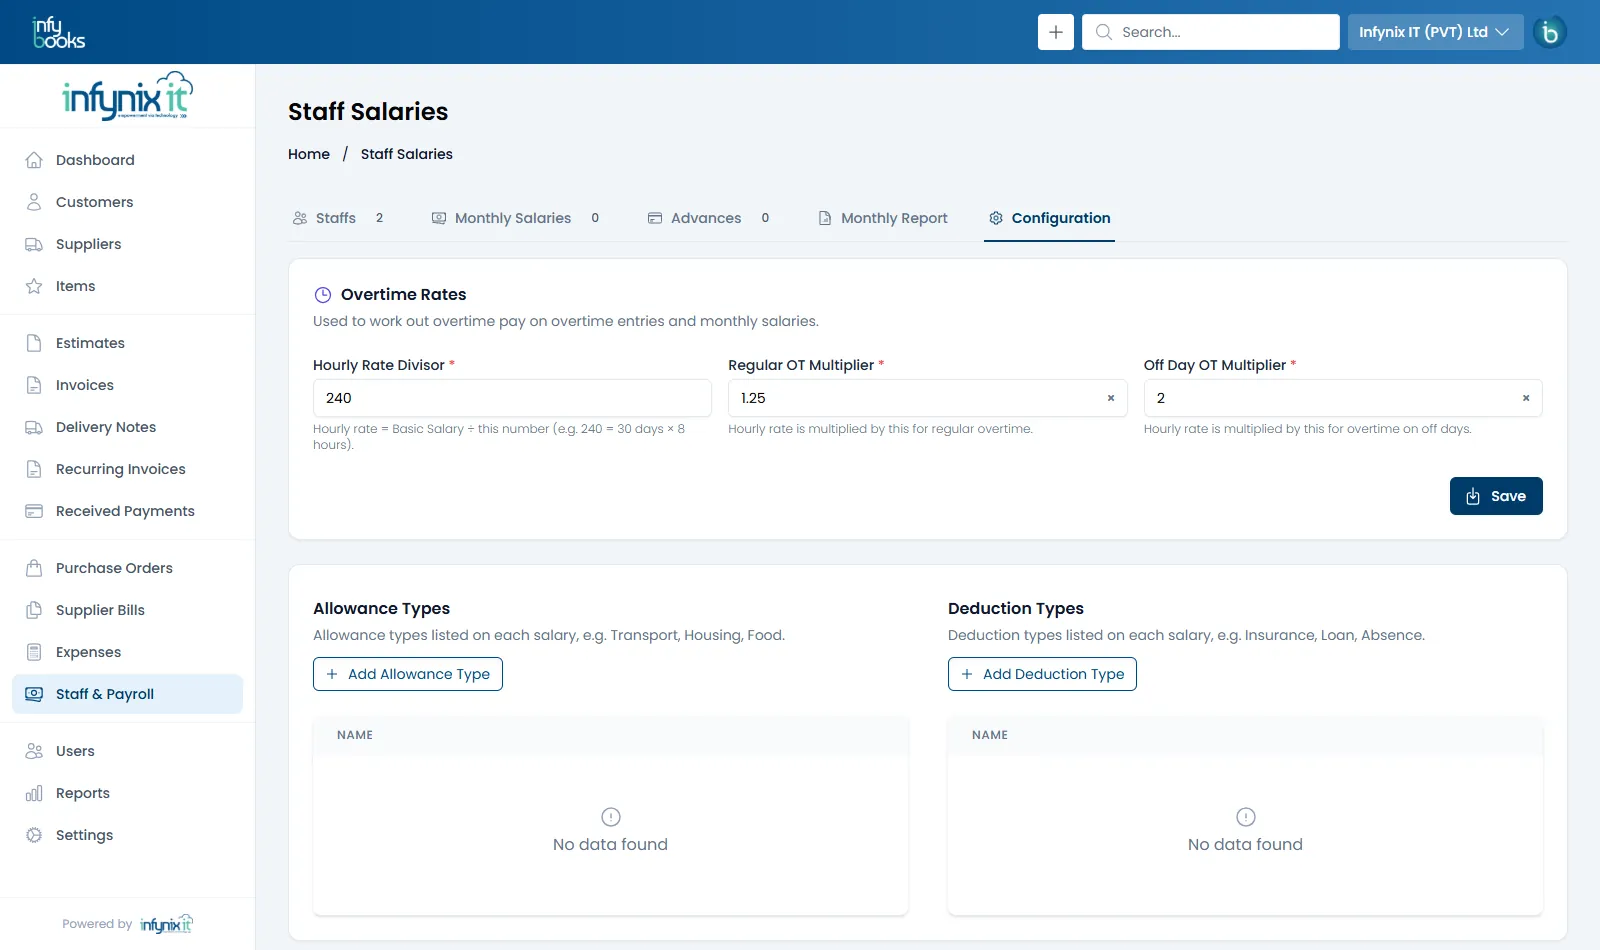
Overtime rates, allowance types and deduction types.
Overtime rates
Setting
Default
Meaning
Hourly Rate Divisor*
240
Hourly rate = Basic Salary ÷ this number. 240 = 30 days × 8 hours.
Regular OT Multiplier*
1.25
Hourly rate is multiplied by this for regular overtime.
Off Day OT Multiplier*
2
Hourly rate is multiplied by this for overtime on off days and holidays.
Change the values to match your company policy or local labour regulations, then click Save. New salaries use the updated rates.
Allowance and deduction types
These are the options in the Allowances and Deductions dropdowns on each salary.
Click Add Allowance Type for things you pay on top of basic salary — for example Transport, Housing, Food, Attendance bonus.
Click Add Deduction Type for things you subtract — for example Insurance, Loan, Absence, EPF (employee share).
Staff & Payroll
Payroll reports & payslips
See a whole month's payroll at a glance, download it as a PDF for your records or accountant, and produce individual payslips and staff statements.
In the app: Staff & Payroll › Monthly Report
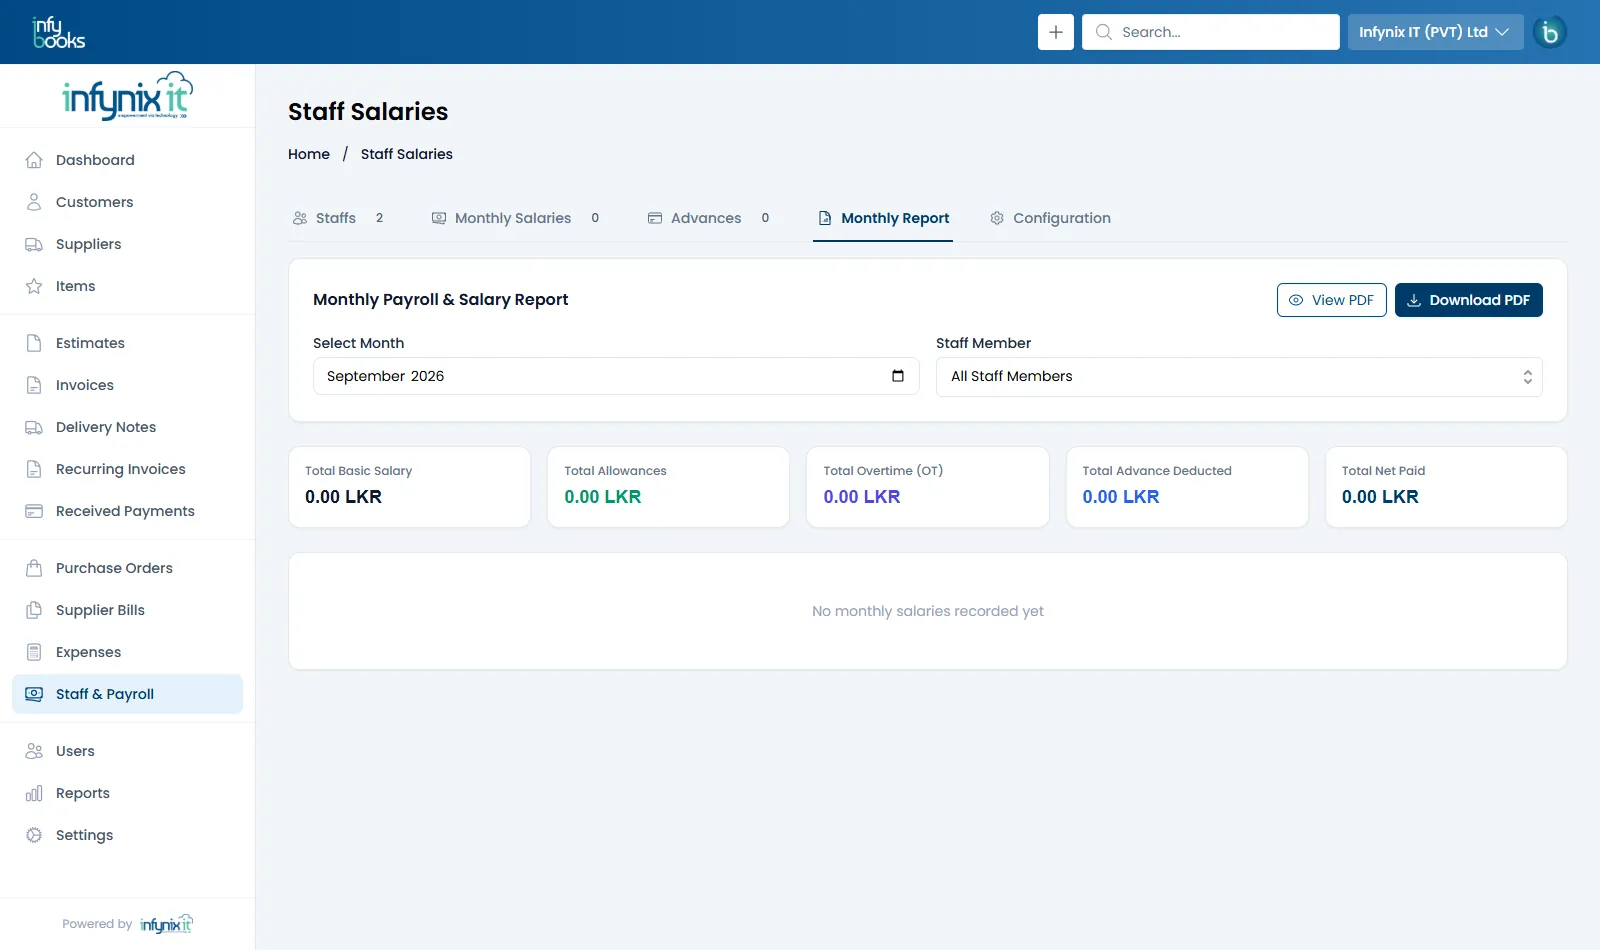
Monthly Payroll & Salary Report
Open the Monthly Report tab.
Choose the month in Select Month.
Leave Staff Member on All Staff Members, or pick one person.
Review the totals, then click View PDF or Download PDF.
The monthly report totals.
The summary cards show Total Basic Salary, Total Allowances, Total Overtime (OT), Total Advance Deducted and Total Net Paid, with a breakdown per staff member below.
Payslips
On the Monthly Salaries tab, each salary has a Payslip download — a salary statement for that employee and month.
Staff ledger and statement
On the Staffs tab, click Transactions to see a person's full account: salary accruals (credits), payments and advances (debits), advance taken and recovered, and the running balance. Click the document icon to download it as a Statement PDF.
Manage
Reports
Reports turn the invoices, payments, bills and expenses you're already recording into answers — profit, sales, tax and who owes you. There's nothing to export or re-enter.
In the app: Reports
Run a report
Open Reports and choose a report tab.
Pick a Date Range: Today, This Week, This Month, This Quarter, This Year, Previous Week, Previous Month, Previous Quarter or Previous Year — or set your own From Date and To Date.
Click Update Report. The report renders as a PDF preview on the right.
Click Download PDF to save it, or use the preview's print button.
Available reports
Report
What it answers
Sales By Customer
How much did each customer buy in the period?
Sales Customer Statement
A statement of invoices, payments and balance for a customer.
Sales By Item
Which products and services sold, and for how much?
Profit & Loss
Income, expenses by category, and net profit for the period.
Expenses
Spending broken down by expense category.
Taxes
Tax collected on sales, by tax type — useful for VAT returns.
Receivables Due List
Every unpaid invoice and how much is outstanding — your collections list.
Reports need the View Financial Reports permission. If you can't see them, ask your administrator to add it to your role.
Manage
Users
Give your team their own logins. Each user gets a role in each company they can access, so a sales rep can raise invoices without seeing payroll, and your accountant can see reports without editing anything.
In the app: Users
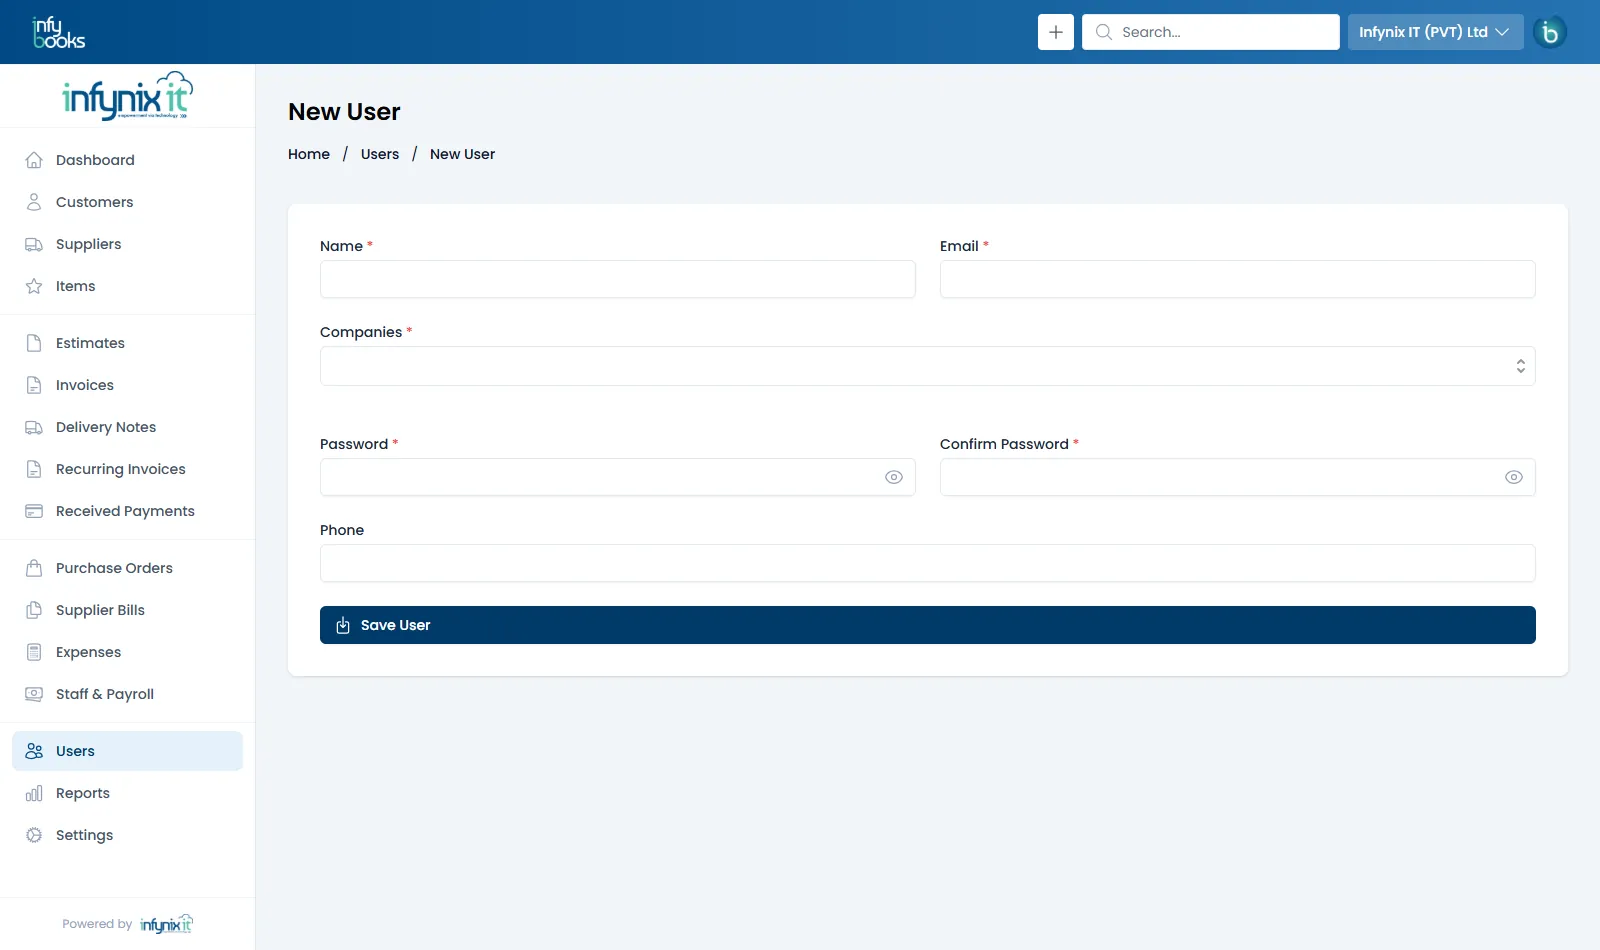
Add a user
Go to Users › New User.
Enter their Name and Email — the email is their login.
Under Companies, select each company they should access. For each company, choose their role.
Set a Password and Confirm Password. Add a Phone number if you like.
Click Save User, then share the login details with them securely.
Pick companies, then a role for each.
Users can change their own name, password and language later from Account Settings.
User limits
The number of users you can add depends on your plan: Starter includes 2 users, Growth 3 and Business 5. Compare plans or contact us if you need more seats.
Removing access
To remove someone, delete them from the Users list. The invoices and other records they created stay in place. To change what someone can do without removing them, edit their role instead.
Manage
Roles & permissions
A role is a named set of permissions — for example Sales, Accounts or Store Keeper. Assign roles to users to control exactly what they can see and do.
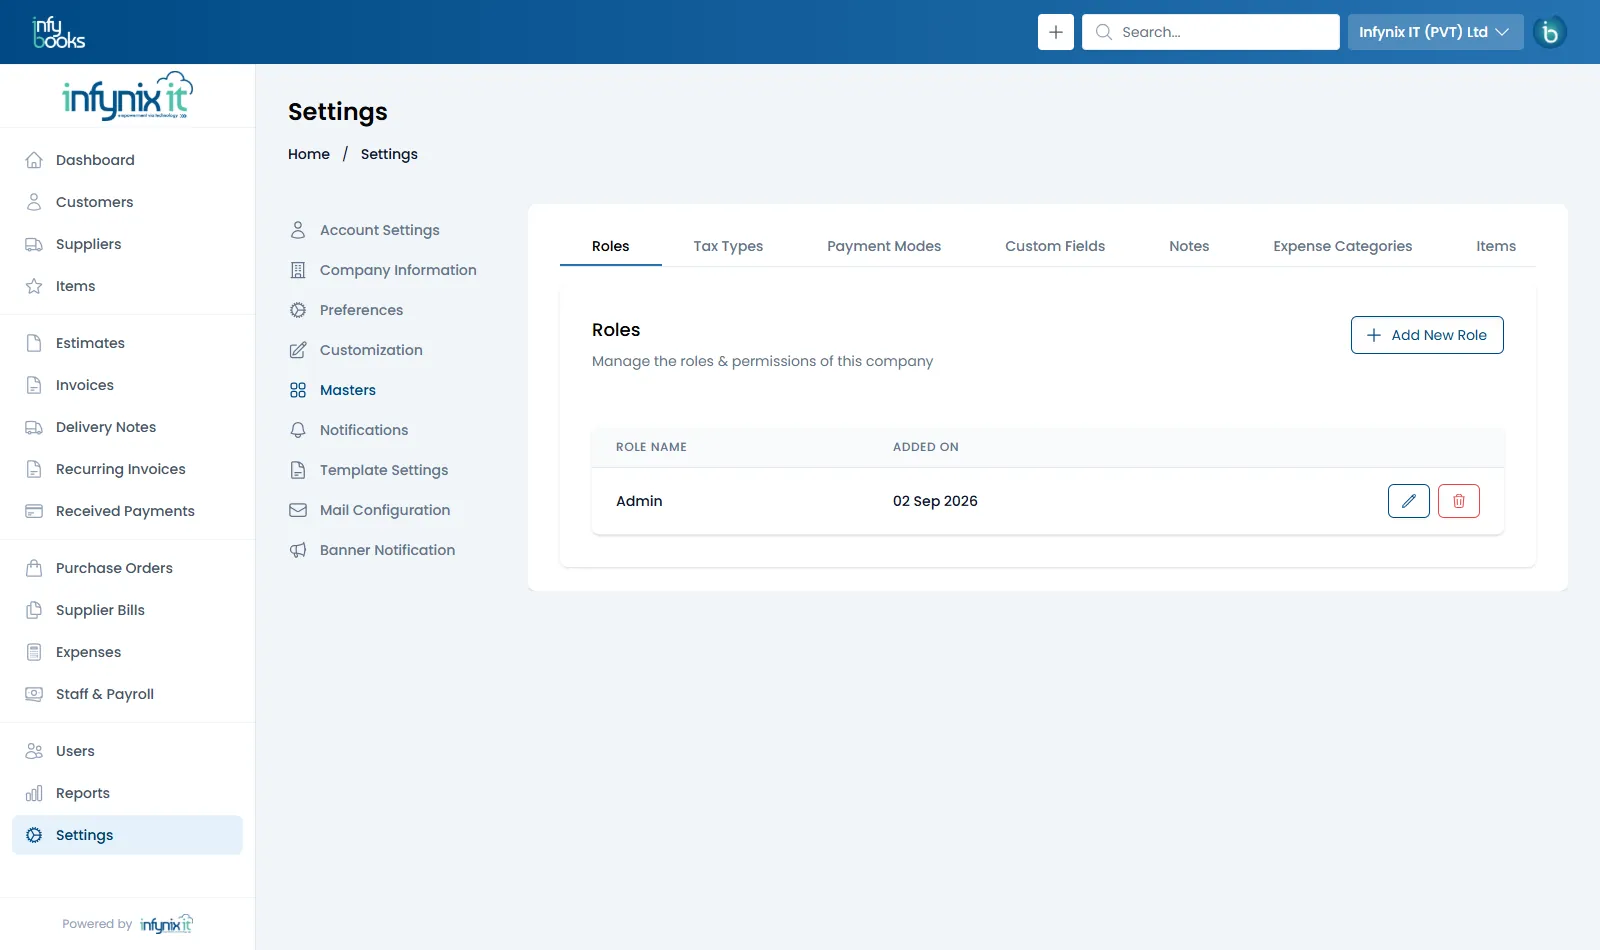
In the app: Settings › Masters › Roles
Create a role
Go to Settings › Masters › Roles and click Add New Role.
Give the role a clear name.
Tick the permissions it needs, module by module.
Save. The role is now available when you add or edit a user.
Some permissions depend on others. For example, create invoice also needs permission to view customers, items, tax types, custom fields and notes — InfyBooks ticks those for you automatically.
Example roles
Sales — customers, items, estimates and invoices (view, create, send). No delete, no settings, no salary.
Accounts — everything in payments, supplier bills and expenses, plus financial reports.
Viewer / Auditor — view-only on every module, plus reports.
Settings
Company information
Your company's name, logo, address, registration numbers and bank details. These print on every invoice, estimate and receipt, so keep them accurate.
In the app: Settings › Company Information
Company information.
Fields
Field
Description
Company Logo
Printed on documents that don't use a letterhead. PNG or JPG with a transparent or white background works best.
Company Name*
Your trading name as it should appear on documents.
Phone
Your main business number.
Reply To*
When customers reply to an emailed invoice or estimate, their reply goes to this address.
From Mail Name*
The sender name customers see on emails from InfyBooks.
Organization Address
PO box, street address, city, zip, state and country*.
Tax / VAT Identification Number
Printed on invoices where your tax authority requires it.
Company Registration Number
Your business registration (CR) number.
Bank details
Enter your Bank Name, Account Name and Account Number, then choose where they appear: Show on invoices, Show on estimates and Show on payment receipts. Customers can then pay by transfer without asking for your details.
Multiple companies
If you run more than one business, each company has its own customers, documents, numbering, settings and reports. Switch between them with the company name in the top bar. When a company isn't in use, the system owner can disable it (its users can't log in until it's re-enabled) — or delete it permanently, which removes all of its data.
Settings
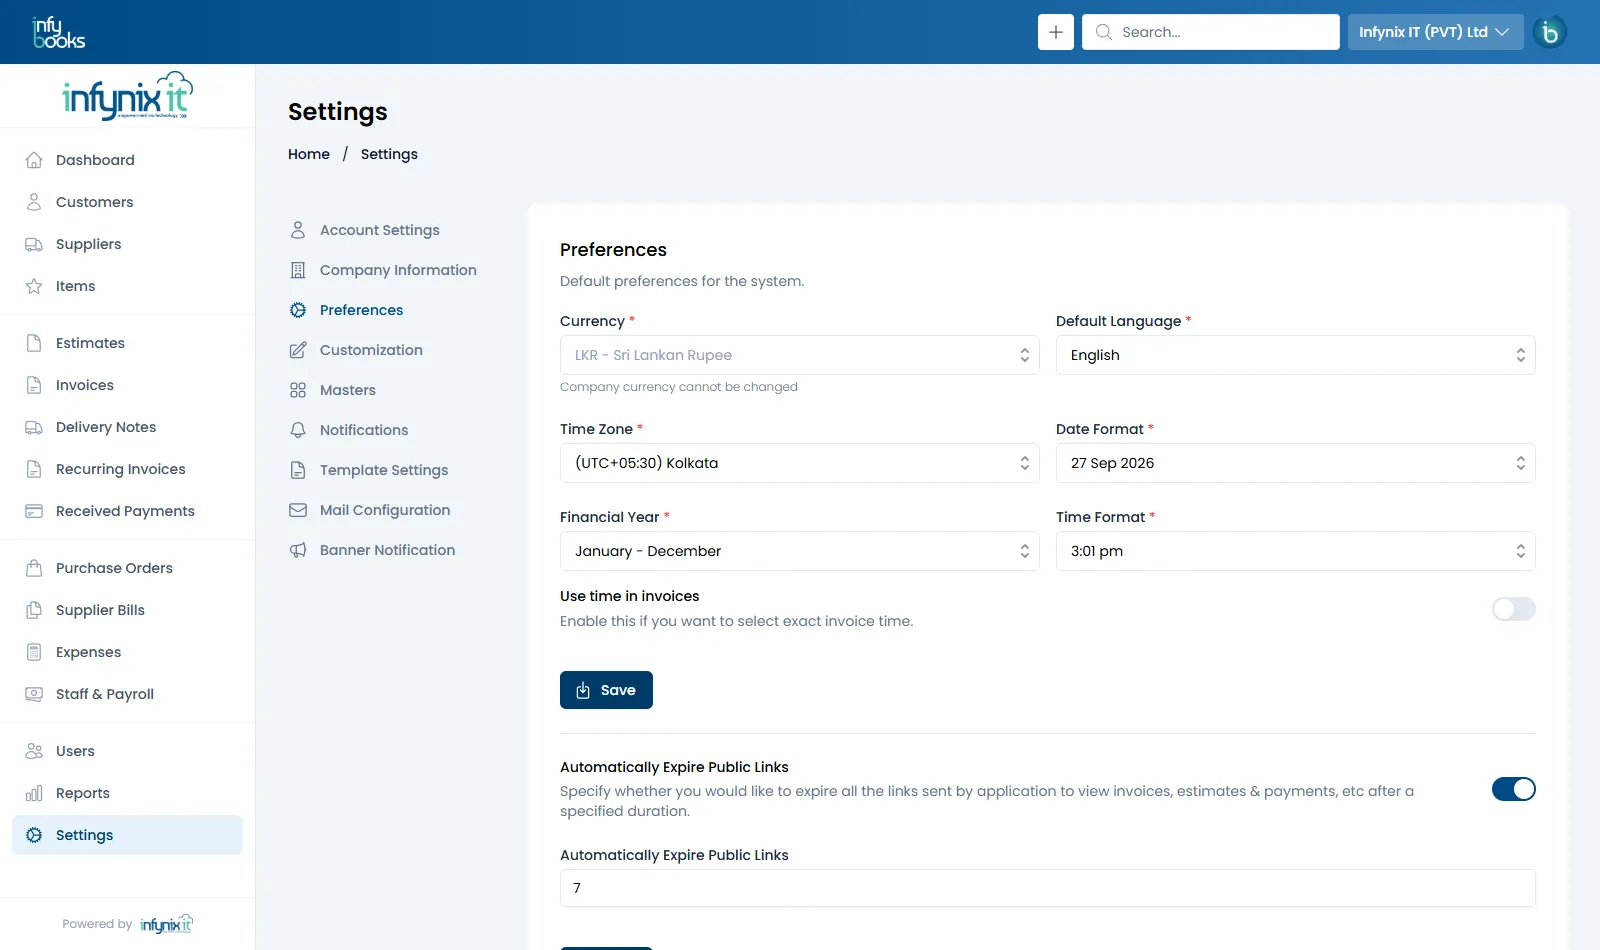
Preferences
Regional defaults for your company: currency, language, time zone, date format and financial year.
In the app: Settings › Preferences
Preferences.
Setting
Description
Currency
Your company's base currency (for example LKR, QAR or AED). It's fixed once the company is created and can't be changed, so every total and report stays consistent.
Default Language
The language of the app and of your documents. Individual users can choose their own language in Account Settings.
Time Zone
Controls "today", due-date calculations and when recurring invoices run.
Date Format
How dates appear on screens and PDFs, for example 27 Sep 2026 or 27/09/2026.
Financial Year
January–December, April–March and so on. Used by the dashboard's "This Year" view and by reports.
Time Format
12-hour (3:01 pm) or 24-hour (15:01).
Use time in invoices
Turn on to record an exact time, not just a date, on invoices.
Automatically expire public links
Links you share with Copy URL or by email let customers view a document without logging in. Turn on Automatically Expire Public Links and enter a number of days to have those links stop working after that period. The document itself isn't affected — you can always share a fresh link.
Settings
Customization & document numbering
Decide how each type of document is numbered, what fills in automatically when you create one, what goes in the email, and which columns show on each list.
In the app: Settings › Customization
Customization has a tab for each document type: Invoices, Estimates, Payments, Expenses, Purchase Orders, Supplier Bills, Delivery Note and Customers (for customer codes).
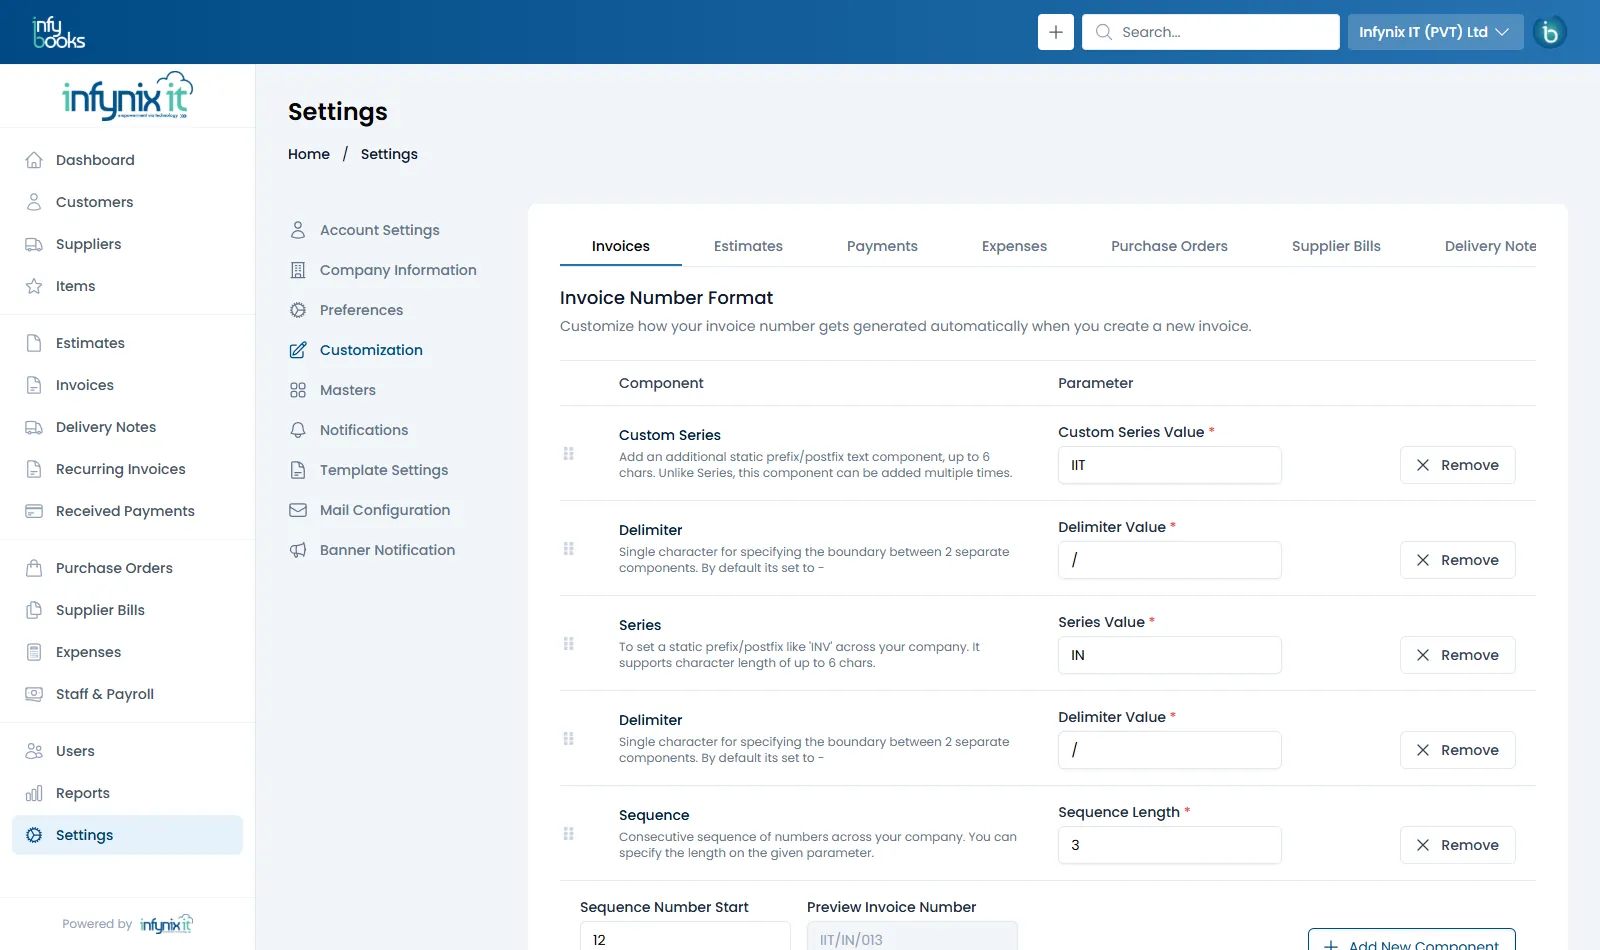
Build a number format
A number is made of components placed in order. Add components with Add New Component, drag the handles to reorder, and watch the Preview update.
Custom Series + Delimiter + Series + Delimiter + Sequence = IIT/IN/013.
Component
What it adds
Example
Series
A fixed prefix/suffix for this document type, up to 6 characters.
INV
Custom Series
Extra fixed text, up to 6 characters. Can be used more than once.
ABC
Delimiter
A single separator character between components. Default -.
/
Sequence
A running number across the company, padded to the length you set.
001
Date Format
Part of the document date. The default Y gives the year.
2026
Customer Series
A different prefix for each customer.
CS5445
Customer Sequence
A separate running number per customer.
07
Random Sequence
A random alphanumeric string of the length you set.
X7K2Q
Sequence Number Start sets the number the sequence continues from for new documents — useful when you're moving from another system and want to carry on from, say, invoice 250. Existing documents keep their numbers.
Change formats before you start issuing documents. Changing them mid-year is allowed, but a consistent, gap-free sequence is easier to audit and is often a tax requirement.
Defaults for new documents
Setting
Tab
What it does
Set Due Date Automatically
Invoices
Fills in the due date as Invoice Due after days from the invoice date. Also used for invoices created by recurring schedules.
Set Expiry Date Automatically
Estimates
Fills in the expiry as Estimate Expires after days from the estimate date.
Estimate Convert Action
Estimates
What happens to an estimate after it's converted to an invoice: No action, Delete estimate or Mark estimate as accepted.
Copy Notes to Invoice
Estimates
Carries the estimate's notes over when converting.
Retrospective Edits
Invoices
Whether finalised invoices can be edited: Allow, or disable after the invoice is sent, after a partial payment, or after full payment.
Default formats
Invoices, Estimates, Payments
The default email body and the address layouts (company, billing, shipping) printed on documents. Use placeholders to insert fields such as the customer name or amount.
Send as attachments
Invoices, Estimates, Payments
Attach the PDF to the email instead of sending a "View" link. The View button won't appear in the email when this is on.
Table columns
Each tab also has Table Columns, where you choose which columns appear on that module's list. Recurring invoices only have table columns — they don't have numbers of their own, because every invoice they create takes the next invoice number.
Settings
Taxes
Set up the taxes you charge — VAT, sales tax, service charges or anything else — then apply them to whole documents or to individual lines.
In the app: Settings › Masters › Tax Types
Add a tax type
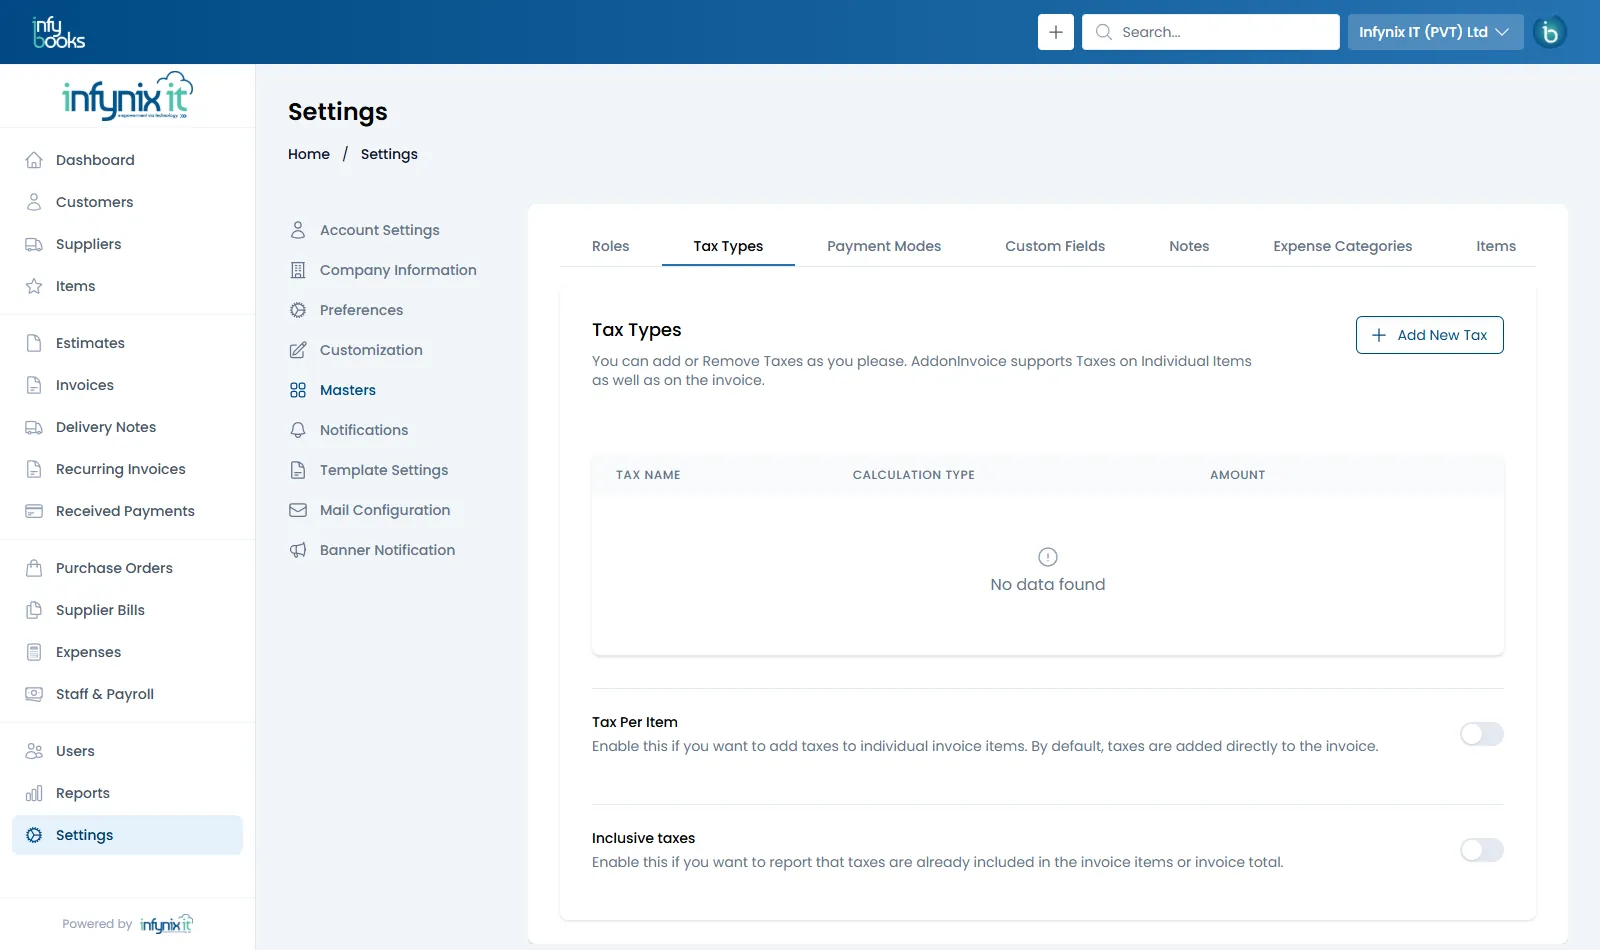
Go to Settings › Masters › Tax Types and click Add New Tax.
Enter a Name (for example VAT 18%).
Choose the calculation: Percentage (enter the rate) or Fixed Amount (enter the amount).
Add a Description if helpful, and save.
Tax types, plus the Tax Per Item and Inclusive taxes switches.
Applying taxes
On any invoice, estimate, recurring invoice, purchase order or supplier bill, click + Add Tax in the totals panel and pick the tax. It's calculated on the sub total after discount. You can add more than one tax.
Tax options
Option
When to use it
Tax Per Item
Turn on if different lines carry different taxes. Each line then gets its own tax selector instead of one tax on the whole document.
Inclusive taxes
Turn on if your prices already include tax. InfyBooks reports the tax contained in the total rather than adding it on top.
Tax collected is summarised in the Taxes report. See Reports.
Settings
Masters & custom fields
Masters are the lists that power the dropdowns across InfyBooks. Set them up once and everyone picks from the same options.
How money moves — cash, cheque, card, bank transfer, or your own (for example a specific bank account).
Custom Fields
Extra fields on your forms and documents (below).
Notes
Reusable text — terms and conditions, bank details, thank-you messages — for invoices, estimates and payments. Insert them with + Insert Note. Star a note to make it the default for its document type.
Item units (pcs, kg, hour, month…), the Discount Per Item switch and item fields.
Signatories
Names available as Received By and Issued By on payment receipts.
Custom fields
Need to capture something InfyBooks doesn't ask for — a delivery route, a VAT number on each customer, a project code on invoices? Add a custom field.
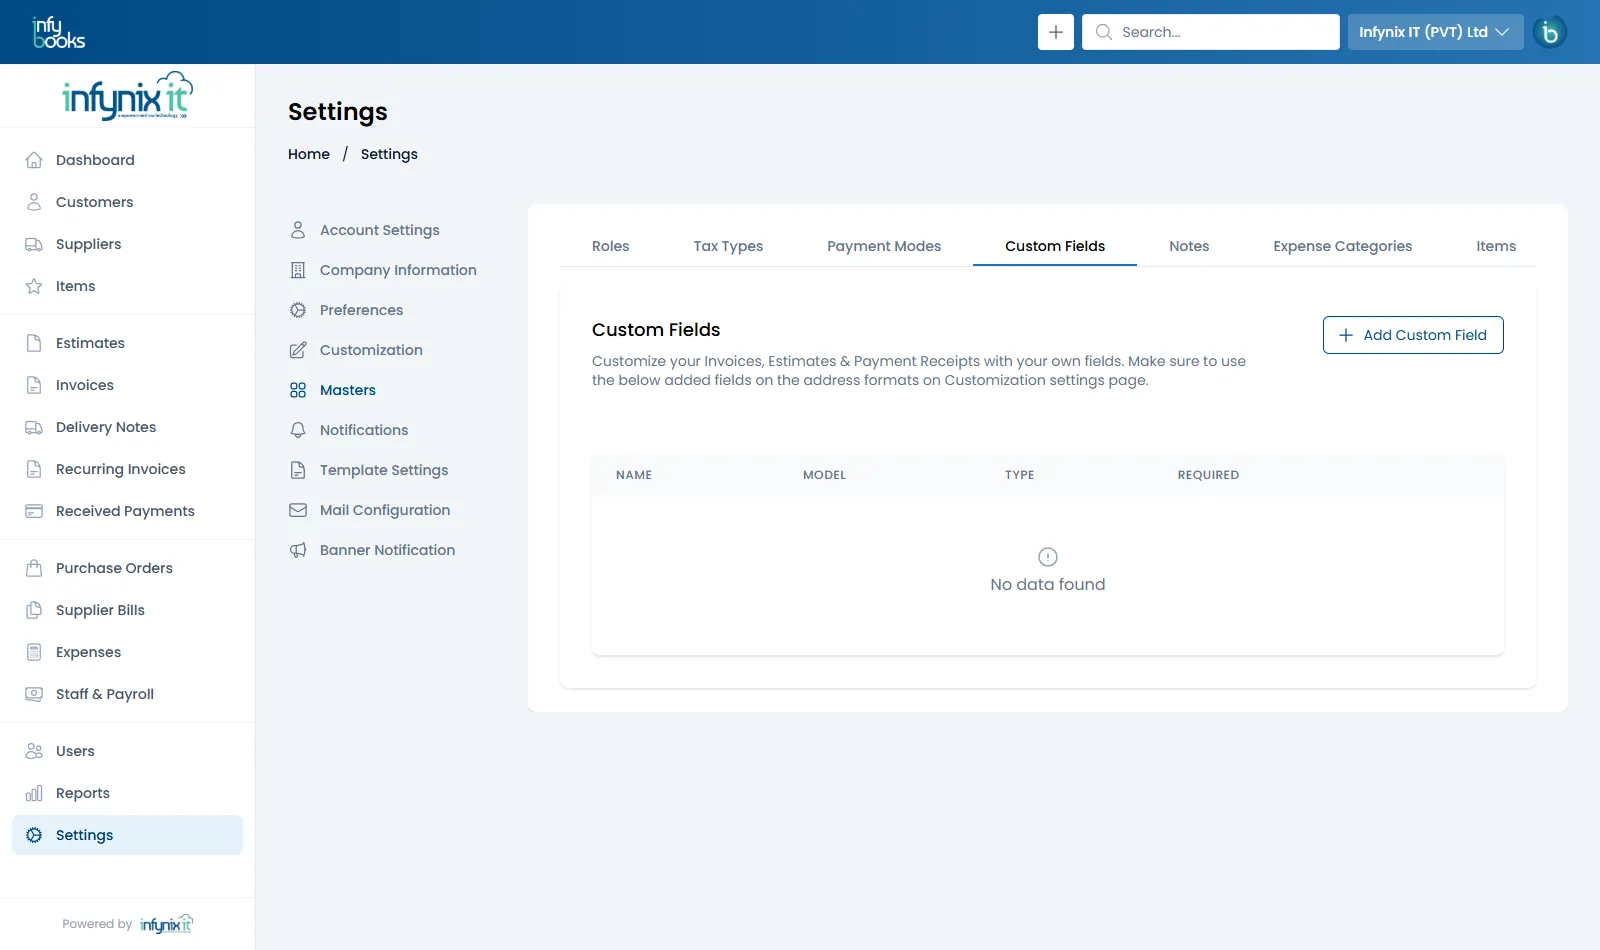
Go to Settings › Masters › Custom Fields and click Add Custom Field.
Enter a name and choose the model it belongs to: Customer, Supplier, Estimate, Invoice, Payment or Expense.
Choose a type: Text, Textarea, Phone, URL, Number, Select Field (dropdown), Switch Toggle, Date, Time or Date & Time.
Set whether it's required, add a default value or placeholder, and save.
Custom fields.
To print a custom field on your PDFs, add its placeholder to the address formats in Settings › Customization, or use Insert Fields in a document's notes.
Settings
Templates & letterhead
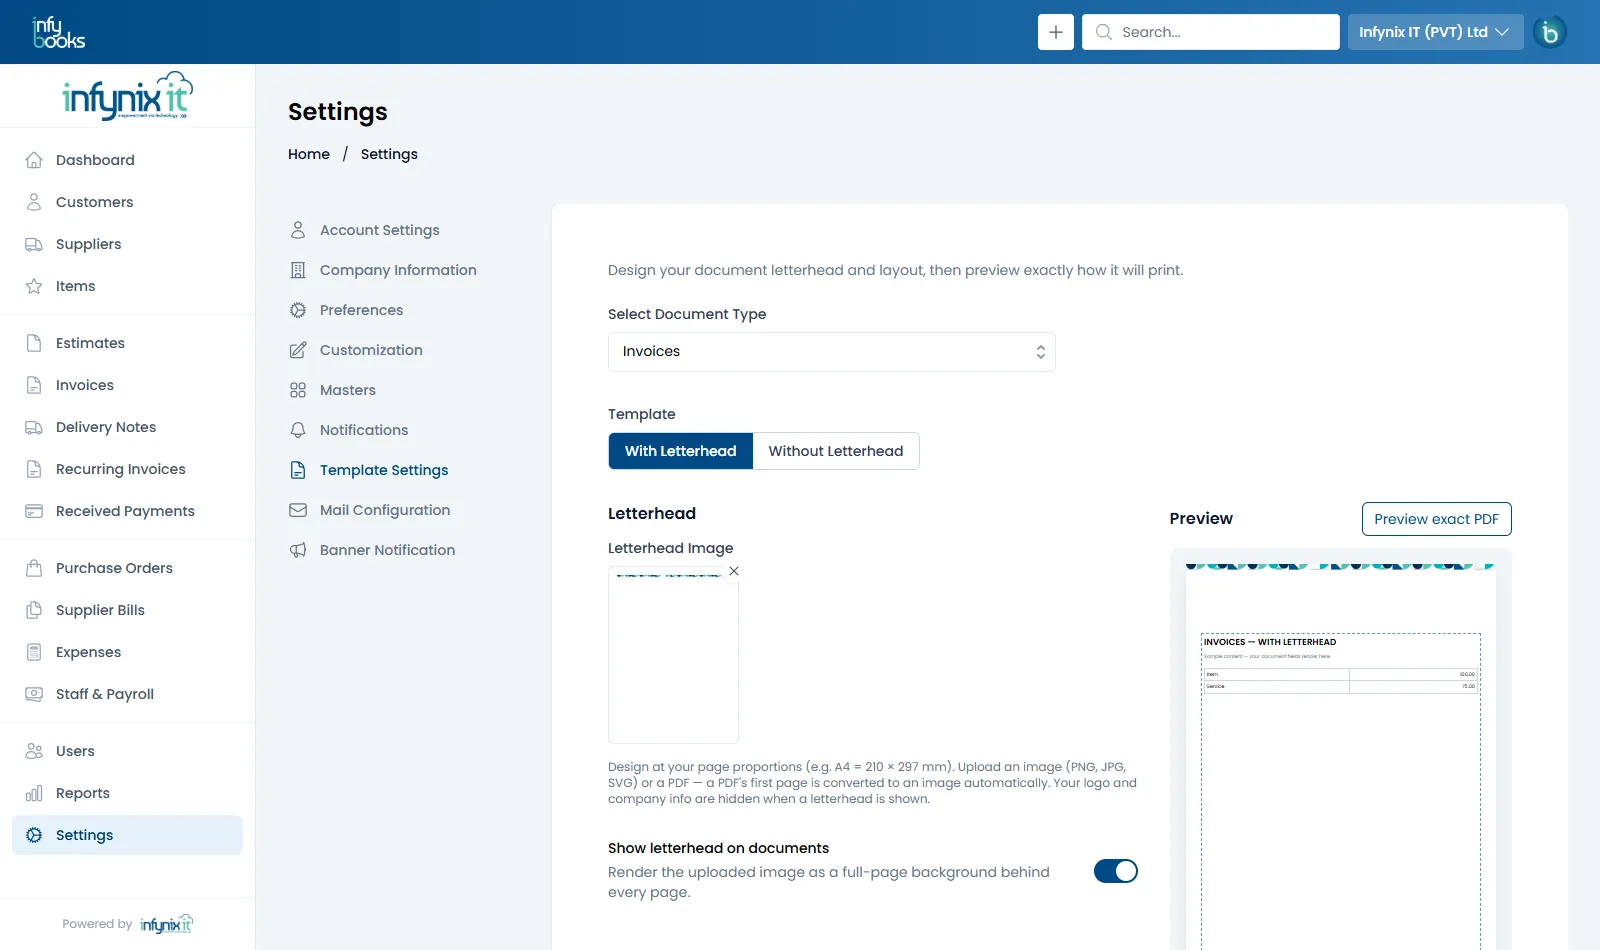
Make every PDF look like it came from your office: print on your own letterhead, set paper size and margins, choose fonts, and preview exactly how it will print.
In the app: Settings › Template Settings
Choose a document and template
Go to Settings › Template Settings.
Under Select Document Type, choose what you're designing — for example Invoices, Estimates, Payments, Delivery Note, Customer Statement or Supplier Statement. Each document type has its own settings.
Choose With Letterhead or Without Letterhead.
Upload a letterhead and preview it live.
Upload your letterhead
Design your letterhead at the proportions of your paper (A4 is 210 × 297 mm) and upload it as a PNG, JPG or SVG — or upload a PDF and InfyBooks converts its first page to an image automatically. Turn on Show letterhead on documents to print it as a full-page background behind every page.
When a letterhead is shown, your logo and company details are hidden from the document — your letterhead already carries them.
Layout options
Section
Options
Paper & Orientation
Paper size (or a custom width and height in mm), portrait or landscape.
Margins & Spacing
Top, bottom, left and right margins (0–100 mm). Content starts / ends offsets keep your text clear of the letterhead's header and footer artwork.
Typography
Font, font size and text alignment. For receipts, separate label and value sizes.
Arabic Translation
Show Arabic labels alongside English on payment receipt vouchers, with their own font and size.
Signature
Print a "For Company Name" / "Receiver's Name and Signature" block at the bottom.
Footer
Optional footer text — leave blank if your letterhead already has one.
Preview before you print
The preview on the right updates as you change settings. For a true-to-print check, click Preview exact PDF. If you want to start over, reset to the defaults (this also removes the letterhead).
Settings
Email & notifications
Control how InfyBooks sends email to your customers, and which alerts you receive when they open your documents.
In the app: Settings › Notifications, Mail Configuration
Notifications
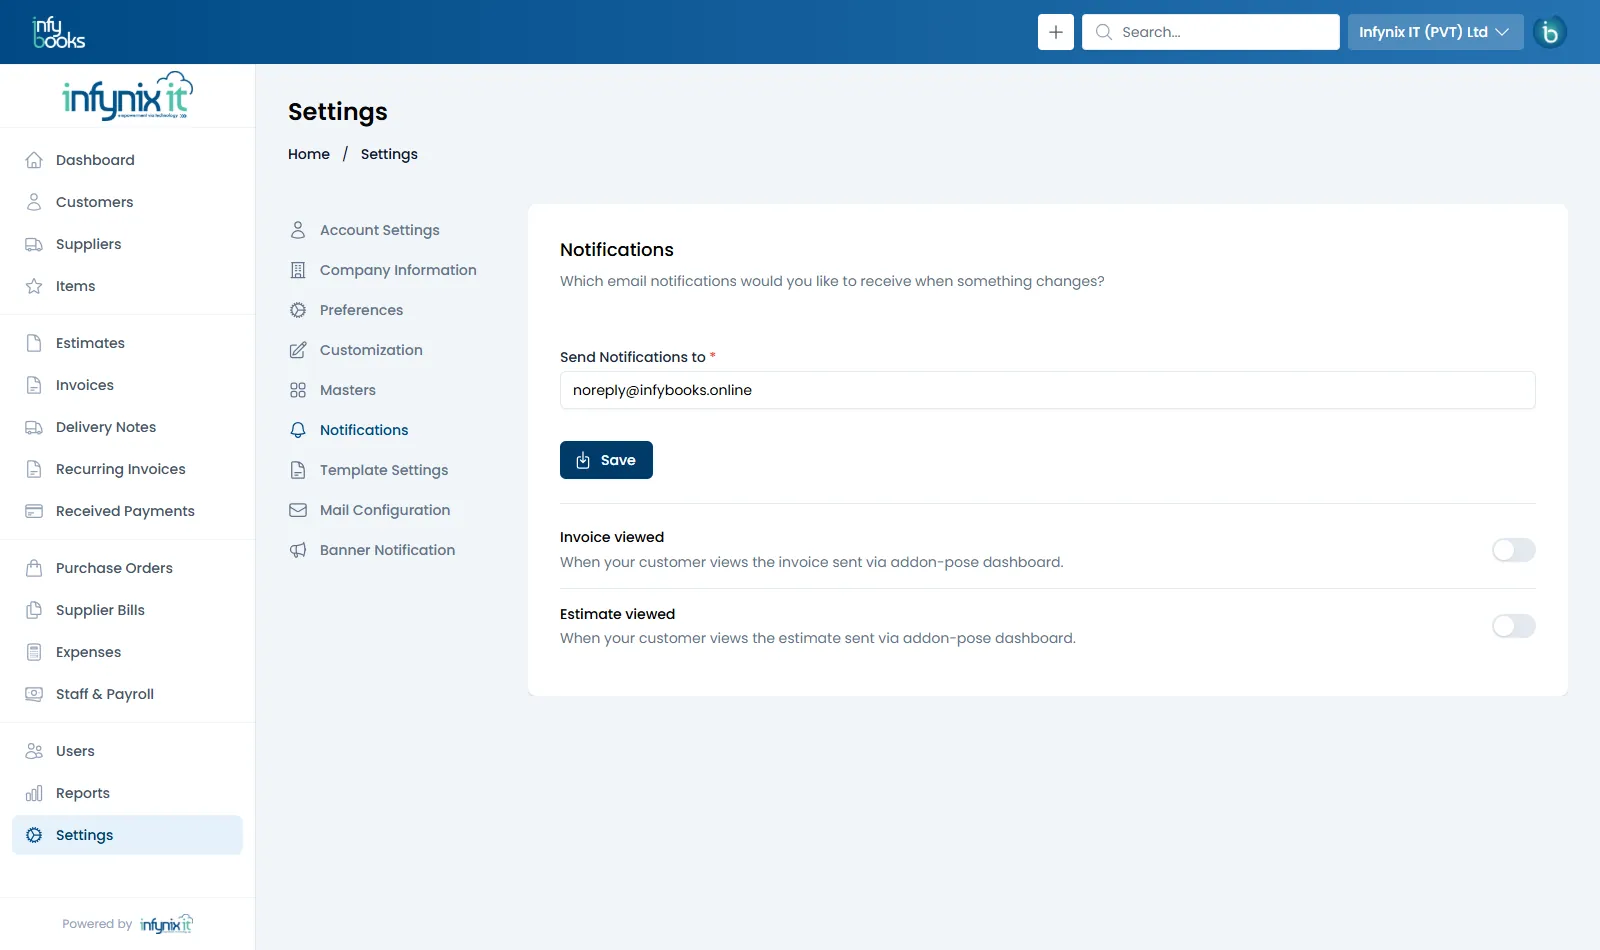
In Settings › Notifications, enter the address under Send Notifications to and click Save. Then choose which alerts you want:
Invoice viewed — when a customer opens an invoice you sent.
Estimate viewed — when a customer opens an estimate you sent.
Get notified when customers open your documents.
Mail configuration
By default InfyBooks sends emails for you. If you'd rather send from your own domain's mail server, the account owner can set it up in Settings › Mail Configuration:
Choose the Mail Driver: SMTP, Mailgun, Amazon SES or Sendmail.
For SMTP, enter the Mail Host, Username, Password, Port and Encryption from your email provider.
Enter the From Mail Address customers will see.
Click Save, then Test Mail Configuration to send yourself a test message.
Set the Reply To and From Mail Name in Company information so replies from customers reach the right inbox.
Email wording
The default message sent with invoices, estimates and payment receipts is set in Settings › Customization under each document's default formats. You can still edit the message each time you send.
Settings
Your account
Update your own profile picture, name, email, password and language. These settings only affect you.
In the app: Settings › Account Settings
Update your profile
Click your avatar in the top-right corner, or go to Settings › Account Settings.
Upload a Profile Picture, and change your Name or Email (your login).
Choose your preferred Language for the app.
Click Save.
Change your password
Enter a new Password and the same value in Confirm Password, then click Save. Leave both empty to keep your current password.
Forgot your password and can't sign in? Click Forgot Password? on the login page and follow the link we email you.
Help
Frequently asked questions
Quick answers to the questions we hear most. Can't find yours? Contact support.
Invoicing & payments
How do I change the invoice number format?
Go to Settings › Customization › Invoices and edit the components under Invoice Number Format. See Customization & numbering.
Can I continue numbering from my old system?
Yes. In the number format editor, set Sequence Number Start to the next number you want. New invoices continue from there.
A customer paid part of an invoice. How do I record it?
Record a payment for the amount received. The invoice becomes Partially Paid and shows the remaining balance. Record another payment when the rest arrives. See Received Payments.
A customer paid for several invoices at once.
Record one payment for the full amount. InfyBooks spreads it across their open invoices automatically — you can adjust the split before saving.
A customer paid in advance, before I invoiced them.
Record the payment anyway. With no unpaid invoices, the amount is saved as advance credit for that customer and can be applied to a future invoice.
Why does an invoice say "Overdue by 3 days"?
Its due date has passed and a balance remains. Record the payment if you've received it, or send the customer a reminder and an Outstanding statement.
Can I stop people editing invoices after they're sent?
Yes — set Retrospective Edits in Settings › Customization › Invoices to disable editing once an invoice is sent, partially paid or fully paid.
Why doesn't a recurring invoice have a number?
A recurring invoice is a schedule, not a bill. Each invoice it creates gets the next number from your invoice series, so your sequence has no gaps. See Recurring Invoices.
Can customers view invoices without an account?
Yes. Share the link from Copy URL, or email the invoice. Customers open it in their browser. You can make these links expire after a set number of days in Preferences.
Setup & settings
Can I change my company currency?
No. The currency is fixed when the company is created so every total and report stays consistent. If you've just started and chose the wrong one, contact support.
How do I put my letterhead on invoices?
Upload it in Settings › Template Settings with With Letterhead selected, and turn on Show letterhead on documents. See Templates & letterhead.
Prices already include VAT. How do I show that?
Turn on Inclusive taxes in Settings › Masters › Tax Types.
A team member can't see a menu item.
Their role doesn't include the "view" permission for that module. An administrator can add it in Settings › Masters › Roles.
How do I bring in my existing customers and invoices?
Hourly rate = basic salary ÷ 240 (by default). Regular OT pays 1.25× the hourly rate; off-day OT pays 2×. All three numbers can be changed in Payroll configuration.
How do I deduct an advance from someone's salary?
On their monthly salary, enter the amount in the Advance Deduction line or click Deduct Full Advance. See Recovering advances.
Do I need to add salaries as expenses?
No. Paid salaries and advances are recorded as expenses automatically. Adding them manually would count them twice.
Help
Contact support
We're a small team that answers every message. Tell us what you were trying to do, what happened instead, and — if you can — attach a screenshot.